Transform discarded materials into stunning home decor while reducing your environmental footprint. From wine bottle vases to pallet wood shelving, eco-friendly DIY projects let you transform your home on a budget while making a positive impact on the planet. The beauty of sustainable crafting lies in its accessibility – everyday items like glass jars, cardboard, and natural materials become the building blocks of unique, personalized decor that tells your story while preserving our environment.
Creating eco-conscious home accessories doesn’t require special skills or expensive materials. Simple techniques like decoupage, natural dyeing, and basic woodworking open up endless possibilities for turning waste into wonderful pieces. Whether you’re crafting planters from plastic bottles, weaving baskets from newspaper, or building furniture from reclaimed wood, each project helps reduce landfill waste while adding character to your living space. Join the growing community of creative environmentalists who prove that style and sustainability go hand in hand.
Transform Your Glass Waste into Statement Pieces
Vintage-Style Vases and Candle Holders
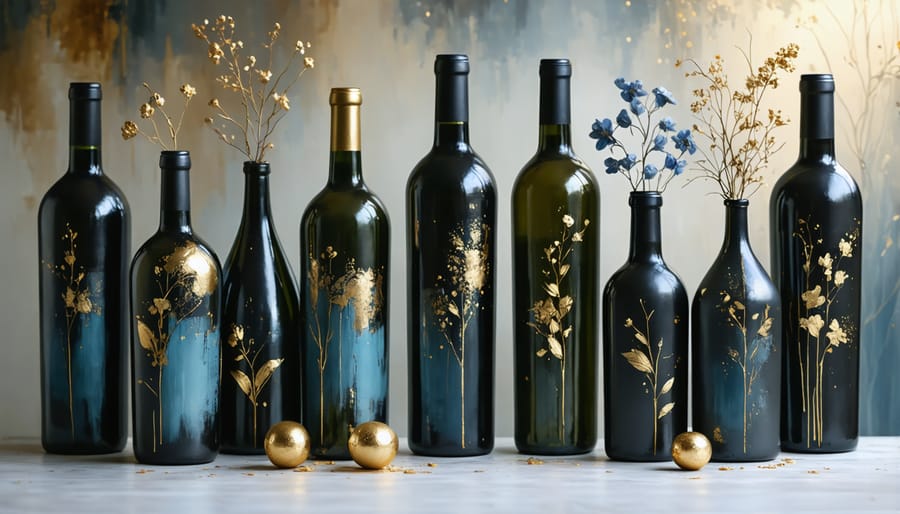
Transform everyday glass bottles into stunning vintage-style vases and candle holders with this simple upcycling project. Start by collecting clean glass bottles and jars – wine bottles, mason jars, and even old sauce containers work perfectly. Remove all labels and adhesive residue using warm soapy water and a scraper.
For a classic frosted look, spray the bottles with glass frosting spray, working in light, even coats. Alternatively, create a textured finish by mixing equal parts white craft paint and baking soda, then applying it with a foam brush for an aged, ceramic-like appearance.
To add vintage charm, wrap twine or jute rope around the bottle’s neck, securing it with hot glue. For extra character, attach vintage buttons, lace trim, or pressed flowers using clear-drying craft adhesive. Consider painting delicate patterns using stencils and metallic craft paint.
For candle holders, ensure the bottle opening is wide enough for your chosen candle. Tea lights work well in smaller jars, while tapered candles can be secured in wine bottles using candle adhesive. For added safety, sand the rim of cut bottles until smooth.
Pro tip: Create a cohesive collection by using bottles of varying heights but similar colors or finishing techniques. Group them together as a centerpiece or arrange them along a windowsill to catch natural light. Remember to place candle holders on heat-resistant surfaces and never leave burning candles unattended.
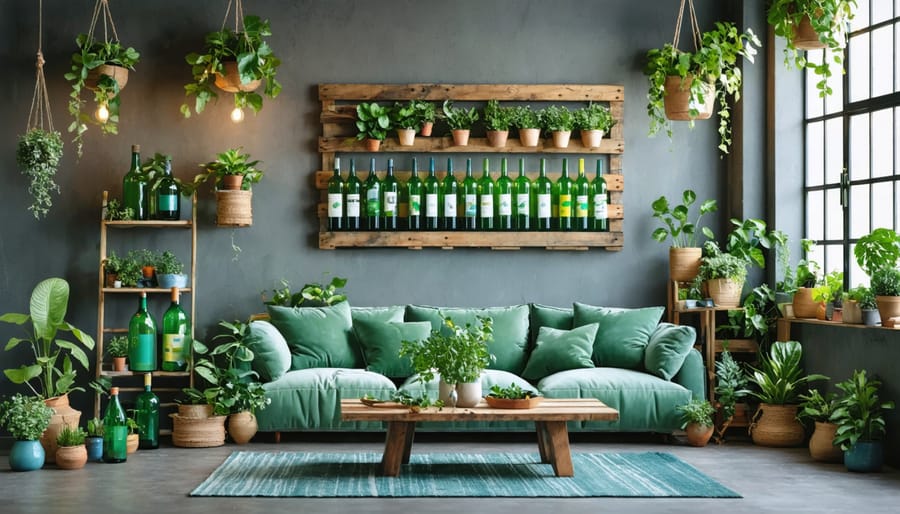
Hanging Garden Planters
Transform your empty glass bottles and jars into stunning hanging planters with this eco-friendly project. Not only will you keep these items out of landfills, but you’ll also create a gorgeous vertical garden that adds life to any space.
Start by collecting clean glass containers – wine bottles, mason jars, or even large sauce jars work perfectly. Carefully remove any labels and adhesive residue using warm, soapy water and a scraper. For stubborn residue, try using a mixture of baking soda and cooking oil.
To create your hanging mechanism, wrap sturdy twine or macramé cord around the neck of the bottle in a secure pattern. Create a loop at the top for hanging, and ensure your knots are tight and evenly spaced. For mason jars, you can wrap the cord under the lip of the jar’s mouth for added security.
Before adding plants, drill a small drainage hole in the bottom of each container using a glass drill bit. Work slowly and keep the glass wet while drilling to prevent cracking. Add a layer of small pebbles at the bottom for drainage, followed by well-draining potting soil.
Choose plants that thrive in hanging containers, such as trailing pothos, string of pearls, or small herbs. Position your planters where they’ll receive appropriate light for your chosen plants, and remember to water moderately – glass containers don’t breathe like traditional pots.
Maintenance tip: Check your hanging mechanisms monthly for wear and replace the cord if needed to prevent accidents.
Wooden Pallet Art and Furniture
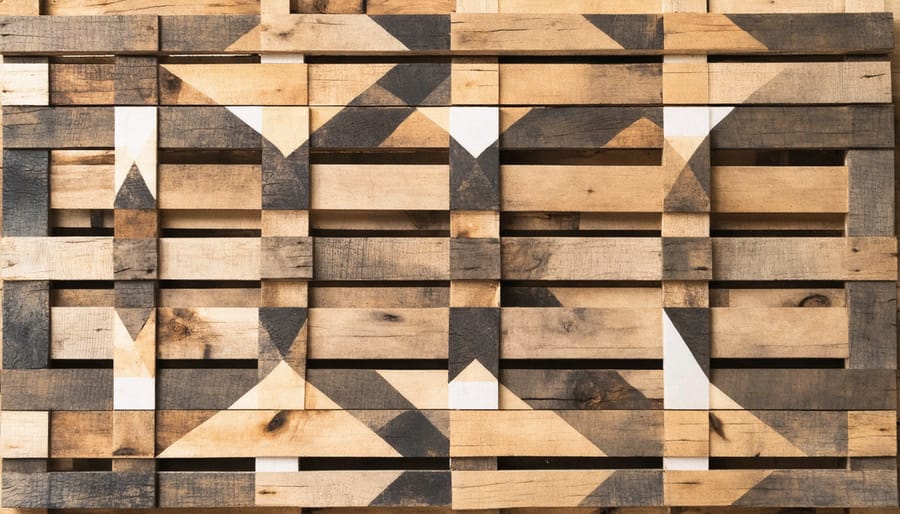
Rustic Wall Art
Transform your living space with stunning rustic wall art using reclaimed wood – one of the most rewarding eco-friendly DIY projects you can tackle. Start by sourcing wood from old pallets, weathered fences, or local salvage yards. Remember to clean your reclaimed wood thoroughly with a mild soap solution and let it dry completely before beginning your project.
For a simple yet striking piece, arrange wooden planks in a chevron pattern. Sand the edges lightly to prevent splinters while maintaining that authentic weathered look. You can either keep the natural patina of the wood or apply a light coat of eco-friendly wood stain to enhance its character.
Create depth and interest by mixing different wood tones and textures. Try combining lighter and darker pieces, or incorporate boards with varying degrees of weathering. For added dimension, consider creating a geometric design by cutting your wood pieces at different angles.
Here’s a pro tip: Before mounting your creation, lay out your design on the floor first. This allows you to experiment with different arrangements until you find the perfect composition. When you’re ready to assemble, use wood glue and reclaimed nails for an authentic rustic look.
To protect your finished piece, apply a non-toxic sealant that’s safe for indoor use. This will preserve the wood while maintaining its natural beauty. Don’t forget to attach sturdy hanging hardware that can support the weight of your creation.
For an extra personal touch, incorporate meaningful elements like vintage hardware, old house numbers, or even family photographs mounted on the wood. These details make your wall art not just sustainable, but also tell a unique story in your home.
Small Accent Furniture
Transform discarded wooden pallets into charming accent pieces that add character to your home while embracing sustainable furniture designs. Pallets are perfect for creating rustic side tables and floating shelves, offering endless possibilities for customization.
For a basic side table, start by thoroughly cleaning and sanding your pallet wood. Select boards in good condition and cut them to your desired dimensions. Create the tabletop by arranging 3-4 boards side by side, securing them with cross-supports underneath. Fashion legs from the remaining pallet pieces, ensuring they’re equal in length for stability. Sand all edges smooth and seal with eco-friendly wood finish for protection.
Creating floating shelves is equally straightforward. Cut pallet boards to your preferred shelf length, then sand them until silky smooth. For added stability, construct a simple box frame using shorter pallet pieces, leaving the front open. Mount the frame securely to wall studs using heavy-duty brackets, then slide your finished shelf piece over the frame.
Pro tips for working with pallets:
– Always choose heat-treated (HT) pallets over chemically treated ones
– Check for nails and remove them carefully
– Use a metal detector to find hidden fasteners
– Consider whitewashing or staining for a more polished look
– Add wheels to side tables for versatility
– Line shelves with leftover pallet wood for a more finished appearance
These projects not only reduce waste but create unique conversation pieces that showcase your commitment to sustainable living. Remember to seal all finished pieces properly to ensure longevity and safe indoor use.
Textile Upcycling Projects
Decorative Pillows and Throws
Transform your old clothes into stunning decorative pillows and throws with these simple upcycling techniques. Start by selecting garments with interesting patterns, textures, or sentimental value – think vintage sweaters, worn-out jeans, or beloved t-shirts that no longer fit.
For a basic throw pillow, cut two equal squares from your chosen garment (18×18 inches works well), ensuring you add an extra inch for seam allowance. Place the pieces right sides together, pin the edges, and sew three sides. Turn the fabric right side out, stuff with eco-friendly filling like organic cotton or recycled polyester, then hand-stitch the final side closed.
Create a cozy throw blanket by combining several knit sweaters. Cut them into equal-sized squares or rectangles, arrange them in a pleasing pattern, and sew them together. Add backing fabric from an old bedsheet for extra warmth and stability.
Pro tip: Use sturdy garments like denim or wool for longer-lasting pillows. For added texture, try incorporating decorative elements from the original clothing – think pocket details, buttons, or embroidery. Remember to pre-wash all materials before starting to prevent shrinkage later.
Want to add extra flair? Create tassels from leftover yarn or fabric strips, or add piping made from contrasting clothing items. These personal touches make each piece unique while keeping textiles out of landfills.
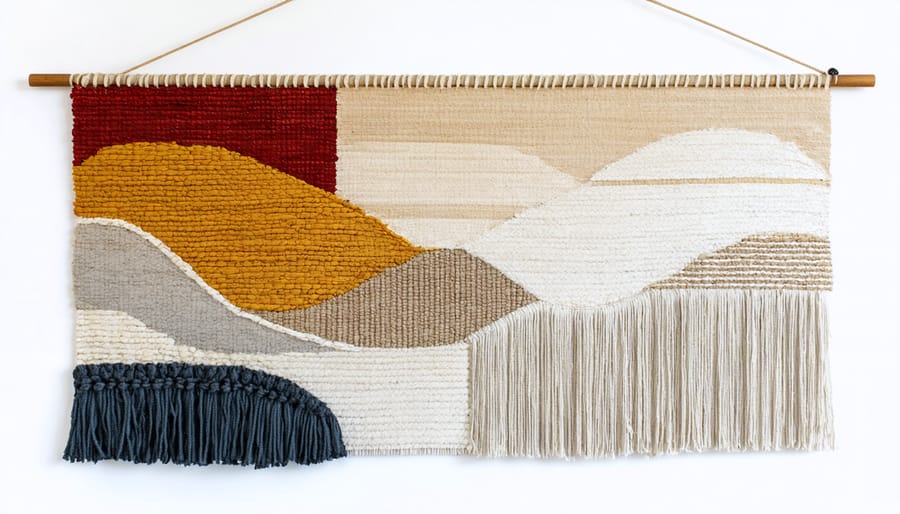
Woven Wall Hangings
Transform your forgotten fabric scraps into stunning wall art with this eco-friendly weaving project. Not only will you create a unique piece for your home, but you’ll also give new life to textiles that might otherwise end up in landfills.
Start by building a simple loom using a wooden picture frame or four pieces of scrap wood formed into a rectangle. Hammer small nails along the top and bottom edges, spacing them about half an inch apart. String cotton twine vertically between the nails to create your warp threads.
Gather your fabric materials: old t-shirts, worn-out bedsheets, or clothing scraps work perfectly. Cut them into long strips about 1-2 inches wide. For a cohesive look, choose fabrics in complementary colors or stick to a specific color palette.
Begin weaving by passing your fabric strips horizontally through the vertical threads, alternating over and under. Mix different textures and weights of fabric to create visual interest. Try techniques like soumak weaving (wrapping around warp threads) or adding small knots for dimension.
For added flair, incorporate natural elements like dried flowers or feathers. Keep your weaving tension consistent but not too tight to maintain an organic, relaxed appearance. Once complete, carefully remove the piece from your loom, secure any loose ends, and attach a wooden dowel at the top for hanging.
Remember, imperfection adds character to handmade pieces – embrace the uniqueness of your creation!
Paper and Cardboard Creations
3D Wall Art
Transform your empty cardboard boxes into stunning geometric wall art that adds dimension and visual interest to any room. This eco-friendly project not only keeps cardboard out of landfills but creates a conversation piece that looks far more expensive than its humble origins.
Start by collecting clean cardboard boxes and cutting them into equal-sized triangles, squares, or hexagons. For a cohesive look, stick to one shape and size throughout your design. Sand the edges lightly to ensure smooth, professional-looking pieces.
Arrange your shapes on the floor first to create your desired pattern. Consider playing with depth by folding some pieces at different angles or layering them. Once you’re happy with the design, paint your pieces in your chosen color scheme. Earth tones work beautifully for a natural look, while metallics can add glamour.
Pro tip: Use water-based, eco-friendly paints and adhesives to keep this project truly sustainable. Apply two thin coats rather than one thick coat for better coverage and durability.
Mount your pieces to the wall using non-toxic adhesive or small brad nails, building your pattern from the center outward. Leave small, even gaps between pieces for a more polished appearance. For added interest, install small LED lights behind some pieces to create dramatic shadows.
This project typically takes an afternoon to complete and can transform an entire wall for less than $20 in supplies, proving that eco-friendly decor can be both beautiful and budget-conscious.
Sculptural Light Fixtures
Transform your old paper waste into stunning sculptural light fixtures that add character to any room while supporting sustainable lighting solutions. This creative project breathes new life into materials that would otherwise end up in landfills.
Start by collecting clean paper materials like old newspapers, magazines, or kraft paper. Cut them into strips of varying widths, between 1-2 inches. Create a basic lampshade frame using wire or repurpose an old shade’s structure. You’ll also need eco-friendly craft glue and a brush for application.
Begin weaving your strips around the frame, overlapping them to create interesting patterns and textures. For added durability, apply a thin layer of glue between layers. You can experiment with different paper types and colors to achieve unique effects – try mixing white office paper with brown kraft paper for a natural, organic look.
To add dimension, crumple some strips before applying them, or fold them into geometric shapes. Remember to leave enough space between layers for light to filter through beautifully. Once complete, seal your creation with non-toxic, water-based varnish to protect it from dust and moisture.
Pro tip: Keep your paper shade at least 3 inches away from any bulb to ensure safety. LED bulbs work best as they produce minimal heat and consume less energy, making your creation both eco-friendly and practical.
Natural Materials and Found Objects
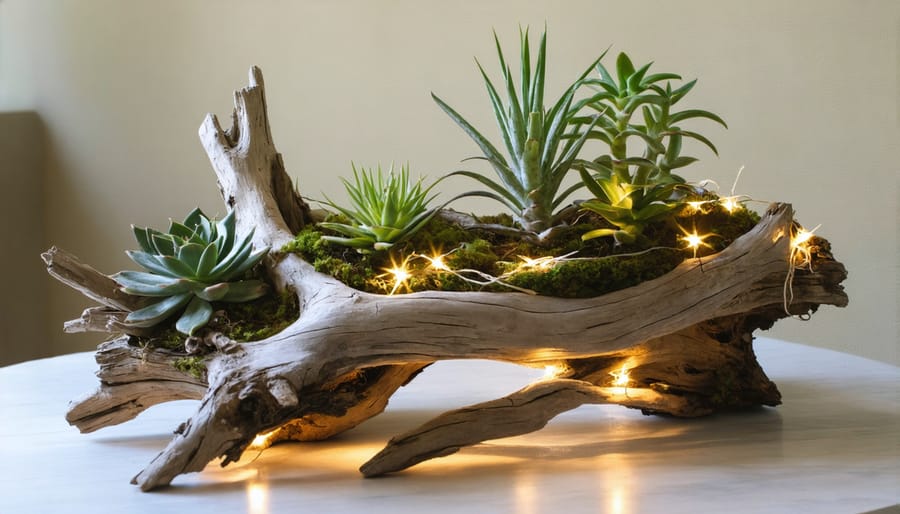
Driftwood Displays
Transform beachcombed treasures into stunning home decor with driftwood displays that bring a touch of coastal charm to your space. Not only is this eco-friendly DIY project completely free, but it also helps clean up our beaches while creating unique artistic pieces.
Start by collecting driftwood pieces during your beach walks, ensuring they’re thoroughly dry before use. Clean each piece by gently brushing off sand and debris, then sanitize with a mixture of water and white vinegar. Allow the wood to dry completely in the sun for several days to prevent any mold growth.
For a striking wall hanging, arrange smaller pieces in a geometric pattern and secure them with natural twine or hemp cord. Create depth by layering pieces of varying sizes and shapes. Alternatively, craft a stunning centerpiece by positioning larger driftwood pieces in a clear glass vase with small LED lights woven throughout.
For a practical twist, transform sturdy driftwood pieces into unique jewelry holders or photo display stands. Simply sand any rough edges, drill small holes for hooks or photo clips, and finish with a light coat of natural beeswax for protection.
Remember to keep the natural beauty of the wood as the focal point. Avoid over-processing or painting the driftwood, as its weathered appearance is what makes each piece special. This sustainable decor option not only adds character to your home but also tells a story of nature’s artistry.
Stone and Shell Arrangements
Transform your outdoor spaces and interiors with stunning arrangements using nature’s own treasures. Stone and shell arrangements offer a sustainable way to bring organic beauty into your home while creating unique focal points that tell a story of natural elegance.
Start by collecting stones and shells from your local beach or garden (always check local regulations first). Look for pieces with interesting shapes, colors, and textures. Clean your findings thoroughly with water and let them dry completely before use.
For a simple centerpiece, arrange larger stones in a circular pattern, gradually working inward with smaller pieces. Add visual interest by mixing smooth river rocks with textured shells. Consider creating layers by using clear glass containers filled with sand as a base for your arrangement.
Try these creative ideas:
– Design a natural mandala using stones of graduating sizes
– Create a zen garden with raked sand and carefully placed stones
– Make shell-bordered picture frames
– Arrange stones in spiral patterns for table decorations
– Build miniature rock gardens in shallow dishes
Pro tip: Use biodegradable adhesive if you need to secure pieces in place, and incorporate small air plants or succulents for added life. Remember to refresh your arrangements seasonally, returning materials to nature when you’re ready for a change.
Maintenance is simple – just dust regularly and occasionally rinse with water to restore natural luster. These arrangements not only beautify your space but also serve as mindful reminders of our connection to nature.
Embracing eco-friendly DIY projects isn’t just about creating beautiful decorations for your home – it’s about making a positive impact on our environment while expressing your creativity. By repurposing materials and choosing sustainable options, you’re helping reduce landfill waste, minimizing your carbon footprint, and inspiring others to think more consciously about their decorating choices.
The projects we’ve explored demonstrate that sustainable decor doesn’t mean compromising on style. From transforming glass jars into elegant candle holders to crafting unique wall art from reclaimed wood, each piece tells a story of resourcefulness and environmental responsibility. These DIY creations often become conversation starters, spreading awareness about sustainability in an organic, appealing way.
Remember, starting your eco-friendly DIY journey doesn’t require perfect crafting skills or expensive materials. Begin with simple projects using items you already have at home, and gradually challenge yourself with more complex creations as your confidence grows. The satisfaction of creating something beautiful while being kind to our planet is truly unmatched.
Let your creativity flow and don’t be afraid to experiment with different materials and techniques. Every small step toward sustainable living counts, and your home decor choices can inspire friends and family to follow suit. Start your eco-friendly DIY adventure today – your home and the environment will thank you for it.