Transform your home’s comfort and reduce your energy costs with strategic DIY insulation projects that deliver professional-grade results. Start by conducting a thorough energy audit using an infrared thermometer to identify cold spots and air leaks around windows, doors, and electrical outlets. Tackle the most impactful areas first – your attic needs at least 10-14 inches of properly laid insulation, while walls benefit from blown-in cellulose that can be installed through small access holes. Weather-stripping doors and windows, combined with outlet gaskets and foam sealants, creates an effective thermal envelope that prevents up to 30% of heating and cooling loss.
Armed with basic tools and proper safety gear, you can complete most insulation projects over a weekend. Whether you’re installing batts in the attic, sealing rim joists in the basement, or adding an insulated attic hatch cover, these DIY solutions offer immediate comfort improvements and lasting energy savings. Focus on proper ventilation and moisture barriers to prevent condensation issues while maximizing your insulation’s effectiveness.
Understanding Your Home’s Insulation Needs
Common Signs of Poor Insulation
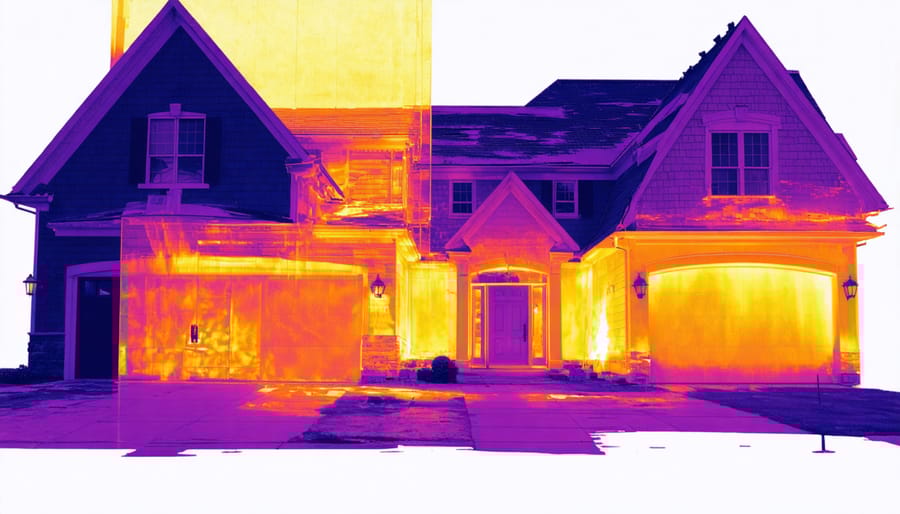
Is your home trying to tell you something about its insulation? Here are some telltale signs that your insulation might need attention. First, run your hands along your walls and windows – if you feel cold spots or drafts, that’s a clear indicator of insulation gaps. Pay special attention during winter months when these temperature differences are most noticeable.
Another big red flag is significantly different temperatures between rooms or floors in your home. If your upstairs feels like a sauna while your basement feels like an ice box, poor insulation could be the culprit. Watch out for unusually high energy bills, especially if they’ve been creeping up over time without major changes in your energy usage patterns.
Physical signs include frost or condensation on interior walls, ice dams on your roof during winter, or walls that feel damp to the touch. You might also notice cold floors, particularly over crawl spaces or unheated basements. If your pipes freeze frequently during cold weather, this could indicate insufficient insulation in your walls.
Take note of any unexplained increases in your heating or cooling costs – they’re often your wallet’s way of signaling an insulation problem.
Essential Tools and Materials
Before starting your insulation project, gather these must-have tools and materials to ensure a smooth, efficient process. This is one of those essential home repair skills that requires proper equipment for the best results.
Safety Equipment:
– Protective goggles
– N95 dust mask or respirator
– Work gloves
– Long-sleeved clothing
– Knee pads
– Hard hat (for attic work)
Basic Tools:
– Utility knife with spare blades
– Measuring tape
– Straight edge or T-square
– Staple gun and staples
– Heavy-duty scissors
– Work light
– Extension cord
– Plywood boards (for attic walkways)
Insulation Materials:
– Chosen insulation (fiberglass batts, blown-in cellulose, or foam boards)
– Vapor barrier (if required)
– Caulk and caulk gun
– Weather stripping
– Wire mesh (for closing gaps)
– Expanding foam sealant
Optional but Recommended:
– Digital thermometer
– Moisture meter
– Professional-grade tape measure
– Wire cutters
– Push broom for cleanup
Keep these tools organized and easily accessible throughout your project for maximum efficiency.
DIY Insulation Projects by Area
Attic Insulation
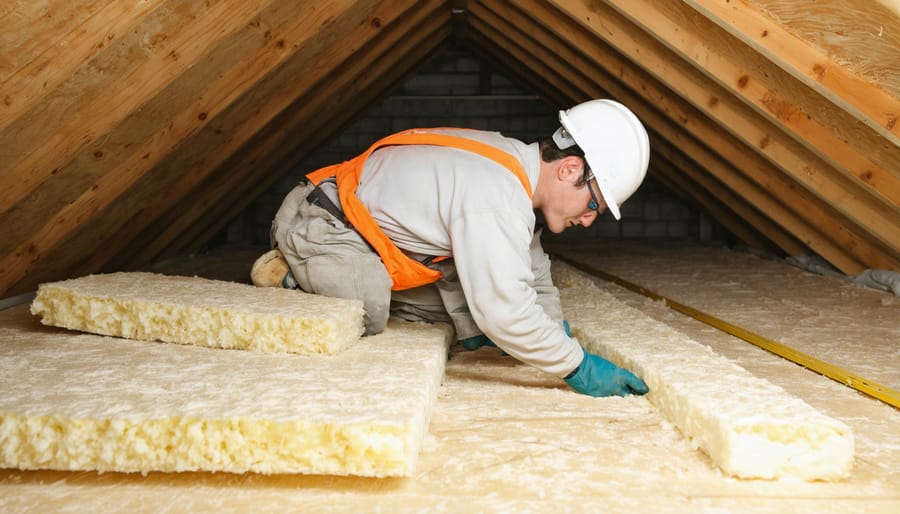
Upgrading your attic insulation is one of the most effective eco-friendly home improvements you can tackle. Here’s your step-by-step guide to getting it done right:
1. Safety First
Put on protective gear: wear a dust mask, safety goggles, long sleeves, and gloves. Bring a bright work light and lay wooden boards across joists to create a safe walking platform.
2. Assess Current Insulation
Measure the existing insulation’s depth with a ruler. If it’s less than 10-12 inches deep, you’ll benefit from adding more. Check for any water damage, mold, or pest problems that need addressing before proceeding.
3. Prep the Space
Clear the attic of stored items and seal any air leaks around pipes, chimneys, and light fixtures using caulk or foam sealant. Install rafter vents (baffles) near the eaves to maintain proper airflow.
4. Choose Your Insulation
Select either fiberglass batts or loose-fill cellulose. Loose-fill typically provides better coverage but requires a blowing machine (rentable from home improvement stores). Batts are easier to install but less effective around obstacles.
5. Installation Process
For batts: Place them between joists, ensuring no gaps or compression. Don’t cover soffit vents.
For loose-fill: Connect the blowing machine hose, feed insulation into the hopper, and apply evenly until you reach the desired depth.
6. Key Tips
– Work backward toward the attic entrance
– Keep insulation 3 inches away from recessed lights unless rated IC (Insulation Contact)
– Don’t forget to insulate the attic hatch
– Maintain consistent depth throughout
Monitor your energy bills after completion – you should notice savings within the first month. Remember to check your insulation annually for any settling or damage that might need attention.
Wall Insulation
Insulating your walls is one of the most effective ways to improve your home’s energy efficiency, and you’ve got several DIY-friendly options to choose from. For existing walls, the two main approaches are drilling and filling wall cavities or adding interior insulation.
Let’s start with the drill-and-fill method. First, verify your wall cavities aren’t already insulated by removing an electrical outlet cover (with the power off!) and peeking inside with a flashlight. If you find empty cavities, blown-in cellulose or fiberglass insulation is your best bet. You’ll need to drill 2-inch holes between wall studs, typically near the ceiling, and use a blowing machine to fill the cavities. Don’t worry – most home improvement stores rent these machines and provide detailed instructions.
For interior wall insulation, you can install rigid foam boards or batts by removing the drywall or adding a new layer of drywall over the insulation. While this method reduces your room size slightly, it’s perfect for older homes where drilling isn’t practical. Start by measuring your wall spaces and cutting the insulation to fit snugly between studs. Remember to wear protective gear – gloves, goggles, and a dust mask are essential!
Pro tip: Before starting any wall insulation project, check for these potential issues:
– Water damage or leaks
– Electrical wiring condition
– Proper vapor barrier needs
– Local building codes and permits
For the best results, tackle one room at a time and seal any gaps around electrical boxes, pipes, and windows before insulating. While this project requires some effort, the improved comfort and energy savings make it well worth your time.
Basement and Crawl Space Solutions
Insulating your basement or crawl space is crucial for maintaining a comfortable home temperature and reducing energy costs. Before starting any insulation project, ensure your space is properly sealed and protected against moisture. Consider a thorough basement waterproofing project first to prevent future issues.
For basement walls, rigid foam boards are your best DIY option. Start by cleaning the walls thoroughly and checking for any cracks or damage. Cut the foam boards to fit between the floor joists, leaving a small gap for expansion. Secure them using appropriate adhesive and mechanical fasteners, making sure to seal the joints with specialized tape.
In crawl spaces, begin by laying a vapor barrier on the ground to prevent moisture from seeping up. Use at least 6-mil polyethylene sheeting, overlapping the edges by 12 inches and sealing with waterproof tape. For the walls, install rigid foam insulation similar to basement application.
Don’t forget about rim joists – these are often overlooked but significant sources of heat loss. Cut rigid foam to fit snugly in each rim joist cavity, then seal the edges with expanding foam sealant. For added R-value, you can place fiberglass batts over the foam boards.
Pro tip: When insulating pipes in these spaces, use foam pipe sleeves that split lengthwise for easy installation. This helps prevent freezing during cold months and improves your home’s overall energy efficiency.
Remember to maintain proper ventilation and always wear protective gear, including a dust mask, gloves, and eye protection. If you spot any signs of mold or serious moisture issues, consult a professional before proceeding with your insulation project.
Door and Window Insulation
Those pesky drafts around doors and windows can make your cozy home feel more like a chilly cave, but don’t worry – there are several quick and effective solutions you can implement today. Start by checking for gaps using the candle test: hold a lit candle near door and window frames (when there’s no breeze), and if the flame flickers, you’ve found a draft point.
For doors, weatherstripping is your best friend. Self-adhesive foam tape is perfect for beginners – just clean the surface, measure, cut, and stick. For a more durable solution, consider vinyl or metal weatherstripping that screws into place. Don’t forget to install a door sweep at the bottom to prevent cold air from sneaking underneath.
Windows deserve equal attention. Rope caulk is a removable option that’s perfect for renters – simply press it into gaps around window frames. For a more permanent fix, use silicone caulk to seal any visible cracks. Window insulation film offers another layer of protection; apply it with double-sided tape and shrink it tight with a hairdryer for crystal-clear results.
For older windows, foam tape between sashes can work wonders, while draft snakes (fabric tubes filled with rice or beans) placed on windowsills provide a charming, effective solution. Remember to check your work annually and replace materials as needed – most weatherstripping lasts 2-3 years before requiring replacement.
Pro Tips and Safety Considerations

Safety First
Before diving into your DIY insulation project, let’s talk about keeping you safe throughout the process. Always start by wearing a proper respirator mask – not just a dust mask – to protect your lungs from insulation fibers and particles. Safety goggles are absolutely essential to shield your eyes, and make sure they seal completely around your eyes.
Wear long sleeves, long pants, and closed-toe shoes – all of which should be washable or disposable. Protective gloves are non-negotiable; opt for thick, cut-resistant ones that cover your wrists. A head covering or disposable hat will keep particles out of your hair.
Good ventilation is crucial. Set up fans to create airflow, and if you’re working in an enclosed space like an attic, use a battery-powered fan. Keep a bright work light handy to ensure you can see what you’re doing clearly.
Before starting, identify all electrical wiring and junction boxes in your work area. Never place insulation directly against electrical fixtures, and maintain proper clearance around recessed lights to prevent fire hazards.
Keep a first aid kit nearby, and it’s smart to have someone else in the house while you’re working – just in case you need assistance. Once you’re done working, shower immediately and wash your work clothes separately from other laundry. Remember, taking these safety precautions isn’t just following rules – it’s protecting your health and well-being.
Common Mistakes to Avoid
When tackling DIY home insulation, knowing what not to do is just as important as knowing what to do. Here are some common mistakes to watch out for and how to avoid them.
First, never compress fiberglass insulation to fit into tight spaces. This actually reduces its effectiveness since insulation works by trapping air pockets. Instead, cut the batts to fit properly or use loose-fill insulation for awkward spaces.
Another frequent error is leaving gaps around electrical boxes and pipes. Even small openings can significantly reduce your insulation’s performance. Take the time to carefully cut around obstacles and seal all gaps with appropriate materials.
Many DIYers forget about proper ventilation, especially in attics. Without adequate airflow, you risk moisture buildup and potential mold growth. Always ensure soffit and ridge vents remain unblocked by insulation.
Skipping vapor barriers is another critical mistake. In most climates, you need a vapor barrier on the warm side of your insulation to prevent moisture problems. Make sure it’s properly installed and sealed at all seams.
Safety oversights are particularly concerning. Working without proper protective gear or stepping between joists can lead to accidents. Always wear a mask, goggles, and gloves, and use sturdy boards to walk on in the attic.
Lastly, avoid mixing different types of insulation without research. While it’s possible to combine varieties, some combinations can reduce effectiveness or create moisture issues. When in doubt, consult a professional for guidance.
Maintaining Your Insulation

Regular Inspection Schedule
To keep your home insulation performing at its best, establish a regular inspection routine throughout the year. Plan to check your insulation at least twice annually – once before winter and once before summer. These seasonal checks help you catch any issues before they affect your home’s energy efficiency.
During your inspection, look for obvious signs of damage like water stains, mold, or compressed insulation materials. Pay special attention to areas around pipes, vents, and electrical fixtures where gaps might develop over time. In your attic, check for any daylight showing through the roof boards, which could indicate areas where insulation has shifted or settled.
Use this simple checklist during your inspections:
– Check for dampness or discoloration
– Look for pest activity or droppings
– Test for drafts around windows and doors
– Measure insulation depth in attic spaces
– Inspect walls for cold spots during winter
– Examine basement rim joists and crawl spaces
Consider using an infrared thermometer during cold weather to identify areas where heat is escaping. This tool can help you spot insulation gaps that aren’t visible to the naked eye. If you notice significant temperature differences between rooms or increasing energy bills, it might be time to add or replace insulation in problem areas.
Keep a log of your inspections, noting any changes or concerns. This record will help you track your insulation’s performance over time and plan for necessary updates or repairs.
When to Call a Professional
While DIY insulation can be rewarding, certain situations call for professional expertise. If you discover extensive water damage, mold, or asbestos in your existing insulation, stop work immediately and contact a certified professional. These hazardous materials require specialized handling and disposal methods that go beyond typical professional repair costs.
Consider calling an expert if you’re dealing with hard-to-reach areas, especially in high or cramped spaces where safety could be compromised. Complex electrical wiring running through your insulation zones is another red flag – improper installation around electrical components can create fire hazards.
If you’re unsure about your home’s current R-value requirements or local building codes, a professional can provide accurate assessments and ensure compliance. They’ll also spot potential issues like inadequate ventilation or structural concerns that might affect your insulation project.
Watch out for these warning signs:
– Unusual odors or discoloration in existing insulation
– Signs of pest infestation
– Large gaps or settling in current insulation
– Multiple layers of old insulation
– Complicated ductwork or HVAC systems
Remember, while DIY projects can save money, some situations require professional expertise to ensure your home’s safety and energy efficiency. When in doubt, it’s better to invest in professional installation than risk costly mistakes or safety hazards.
Taking on a DIY home insulation project might seem daunting at first, but with the right knowledge and preparation, it’s a rewarding way to improve your home’s comfort and energy efficiency. By following proper safety guidelines and choosing the appropriate materials for your specific needs, you can successfully complete this home improvement project while potentially saving hundreds on professional installation costs.
Remember that proper insulation isn’t just about staying warm in winter or cool in summer – it’s an investment that pays dividends through reduced energy bills year after year. Whether you’ve chosen to tackle your attic, walls, or crawl spaces, the key is to maintain attention to detail and never compromise on safety gear or preparation steps.
Before you begin your project, double-check that you have all necessary materials and safety equipment. Take time to properly seal any air leaks, and ensure adequate ventilation in your work area. If you encounter any challenges that seem beyond your expertise, don’t hesitate to consult a professional – some aspects of home insulation can be complex and may require specialized knowledge.
By taking action today to improve your home’s insulation, you’re not just creating a more comfortable living space; you’re also contributing to energy conservation and reducing your carbon footprint. Start with smaller, manageable projects and gradually work your way up to more challenging areas as your confidence grows.