Transform ordinary mannequins and foam heads into terrifying zombies using liquid latex, acrylic paint, and crepe hair to create ultra-realistic haunted Halloween decorations that’ll make neighbors do a double-take. Craft budget-friendly zombie arms bursting from your lawn by filling old clothes with pool noodles, securing them with zip ties, and adding dollar-store skeleton hands painted with weathered green and brown tones. Master the art of zombie-making with household items like paper mache, coffee grounds for texture, and LED lights for haunting eye effects that glow in the dark. Whether you’re a seasoned prop maker or first-time DIY enthusiast, these spine-chilling creations combine simple materials with proven techniques to bring the undead to life in your own front yard – without breaking the bank or requiring professional expertise.
Essential Materials for DIY Zombie Props
Basic Supplies and Tools
Before diving into your zombie DIY projects, gather these common household items and craft supplies. Most of these materials are either already in your home or easily available at local craft stores.
Essential items include:
– Old clothes or fabric scraps
– Liquid latex or white craft glue
– Toilet paper or paper towels
– Acrylic paints (red, brown, green, and black)
– Makeup sponges and brushes
– Spray adhesive
– Scissors
– Wire or pipe cleaners
– Pool noodles or foam sheets
– Hot glue gun and glue sticks
– Plastic bags or drop cloths
– Cardboard boxes
– Zip ties
Optional but helpful supplies:
– Fake blood (store-bought or homemade)
– Plastic skeleton parts
– LED lights or battery-operated candles
– Fishing line
– PVC pipes
– Foam mannequin heads
– Spray paint
– Weatherproof sealant
Remember to work in a well-ventilated area and protect your work surface with drop cloths or old newspapers. Having these supplies ready before starting will make your zombie-creating process much smoother and more enjoyable.
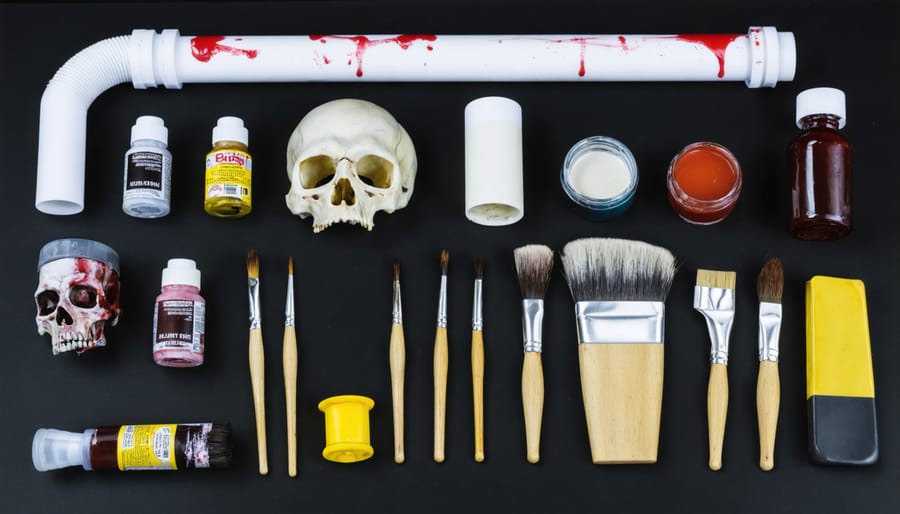
Special Effects Materials
Creating realistic zombie effects doesn’t require expensive Hollywood materials. You’ll need liquid latex as your base – it’s perfect for creating torn flesh and wounds. Pair this with cotton balls or tissue paper to build texture and depth. For blood effects, combine corn syrup with red food coloring and a touch of chocolate syrup for realistic consistency.
Stock up on cream makeup in various shades of green, gray, and purple to achieve that undead look. Cornstarch or baby powder helps set the makeup and creates a dusty, pale appearance. For added texture, coffee grounds make excellent dirt and decay effects when mixed with latex.
Don’t forget spirit gum adhesive for securing prosthetics or loose “skin” pieces. Gelatin-based products can create realistic-looking wounds and decomposed flesh. For that extra gross factor, mix oatmeal with green and brown face paint to simulate rotting flesh.
Remember to grab some disposable sponges, makeup brushes, and cotton swabs for application. A setting spray will help your effects last longer, especially if your zombies will be displayed outdoors. Keep petroleum jelly handy – it helps remove latex and adhesives easily when you’re done.
Ground-Breaking Zombie Decorations
Rising Grave Crawler
Create a spine-chilling scene with this classic rising grave crawler that appears to be clawing its way out of your lawn. Start by gathering PVC pipes, chicken wire, old clothes, and foam mannequin parts or pool noodles. You’ll also need zip ties, duct tape, and weatherproof spray paint.
Begin by creating a frame using two 3-foot PVC pipes connected at a 45-degree angle to form the torso and legs. Attach a shorter piece for the arms, positioned as if pushing up from the ground. Shape the zombie’s body by wrapping chicken wire around the frame, molding it to create a realistic form. Secure it with zip ties.
Dress your zombie in tattered, dirty clothes – the more weathered, the better. Old button-down shirts and pants work perfectly. Create realistic-looking hands by stuffing gloves with cotton and positioning the fingers in a grasping motion. For added creepiness, use foam pieces or pool noodles to build out the shoulders and torso.
Paint exposed parts with gray and green tones to achieve that undead look. Add details like fake dirt, moss, or spider webs to enhance the “fresh from the grave” appearance. Secure your creation in the ground using garden stakes, ensuring it won’t blow away on windy nights.
Pro tip: Position a small spotlight angled upward near your zombie for dramatic nighttime lighting that will make passing trick-or-treaters jump!
Zombie Ground Breaker
Looking to create a spine-chilling zombie that seems to be clawing its way out of your yard? This ground breaker zombie prop is sure to give trick-or-treaters a frightful surprise! Start by gathering PVC pipes for the arms and torso frame, chicken wire for sculpting the body shape, and old clothes that you don’t mind getting dirty and torn.
Create the basic structure by connecting PVC pipes to form a T-shape for the torso and arms. Wrap the frame with chicken wire, molding it to create a realistic body shape. For added creepiness, position the arms reaching outward as if the zombie is trying to grab passersby. Cover the wire frame with spray foam insulation to build up muscle and tissue texture.
Once the foam dries, paint the zombie using a base layer of grayish-green, then add darker shades for depth and decay. Create realistic-looking wounds by applying red and black paint, and don’t forget to add some dirt and grass stains to make it look like it’s actually emerging from the ground.
Dress your zombie in tattered clothes, making sure to strategically rip and dirty them for that freshly-risen-from-the-grave look. Position your ground breaker in the yard by partially burying the lower portion and surrounding it with loose dirt and fake leaves for a more authentic appearance.
For an extra scary touch, consider adding LED eyes or positioning a small spotlight nearby to create eerie shadows after dark.
Life-Size Zombie Props
PVC Pipe Frame Zombie
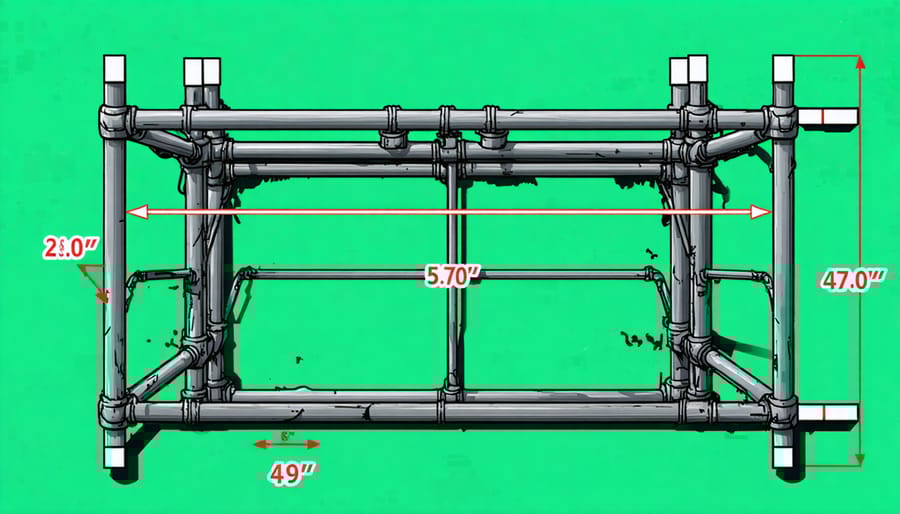
Creating a zombie that can withstand outdoor conditions starts with building a sturdy PVC pipe frame. This affordable and durable foundation will give your zombie the strength to stand up to wind and weather while maintaining a realistic pose.
Begin with a 10-foot length of 1-inch PVC pipe, which you’ll cut into sections for the body frame. You’ll need approximately 3 feet for the torso, 2.5 feet for each leg, and 2 feet for each arm. Connect these pieces using PVC T-joints and elbow connectors to create natural-looking joints at the shoulders, hips, and knees.
For added stability, create a base using two 2-foot pieces of PVC pipe crossed in an X shape, secured with a four-way connector in the middle. This base will connect to the legs and can be weighted down with sandbags or secured to the ground with stakes for extra support.
To make the frame poseable, drill small holes through the PVC at the joint areas and use bolts with wing nuts. This allows you to adjust the pose and lock it in place. The shoulders and hips benefit most from this modification, giving your zombie that characteristic undead slouch.
Remember to measure twice and cut once when working with the PVC. Leave a little extra length initially – you can always trim more off, but you can’t add it back! Once the frame is complete, you can dress it with old clothes stuffed with newspaper or polyester filling, then add your zombie mask and hands to complete the look.
Pro tip: Paint the PVC frame with gray or brown spray paint before adding clothing. This helps camouflage any visible parts of the frame, especially if the clothing shifts in the wind.
Clothes and Stuffing Technique
For a convincing zombie, start with old clothes that you don’t mind getting messy. Oversized shirts, pants, or dresses work best as they allow room for stuffing and create a more realistic, shambling appearance. Tear the clothes strategically – focus on areas like knees, elbows, and hems to create that classic undead look.
Fill your zombie’s body using polyester fiberfill or old newspapers. For a more structured form, begin with a simple frame made from PVC pipes or pool noodles. Stuff the arms and legs first, securing the material with rubber bands or zip ties to create natural-looking joints. The torso should be filled last, paying attention to creating a somewhat lumpy, irregular shape that mimics a decomposing body.
To add extra creepy details, use brown and green fabric paint to create “dirt” and “moss” stains on the clothing. You can also add fake blood splatter using red fabric paint mixed with a bit of brown. For an aged appearance, lightly sand areas of the fabric or use sandpaper to create worn patches.
Pro tip: Layer multiple pieces of clothing for a more realistic effect. A torn shirt over a damaged undershirt, or ripped pants revealing tattered underwear underneath, adds depth and authenticity to your zombie’s appearance. Remember to secure all stuffing well, especially if your decoration will be displayed outdoors where it might face wind or rain.
Zombie Head and Face Effects
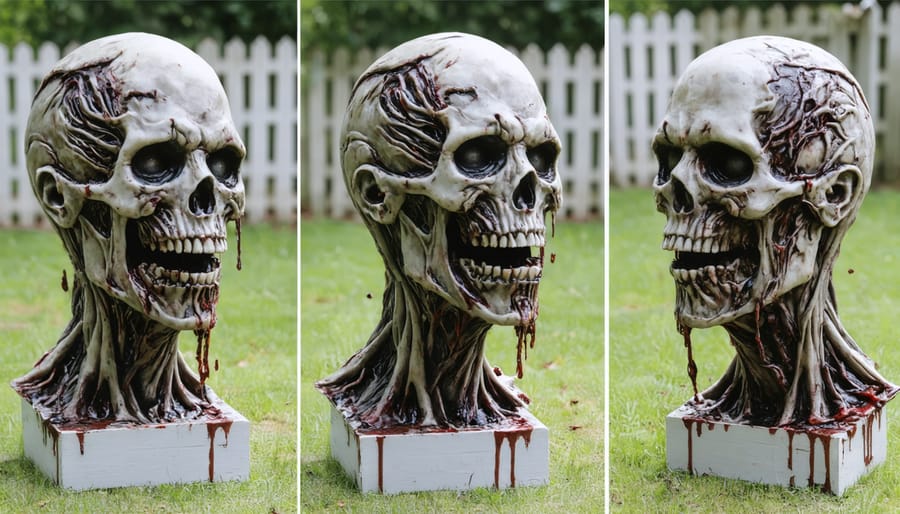
Mask Modification
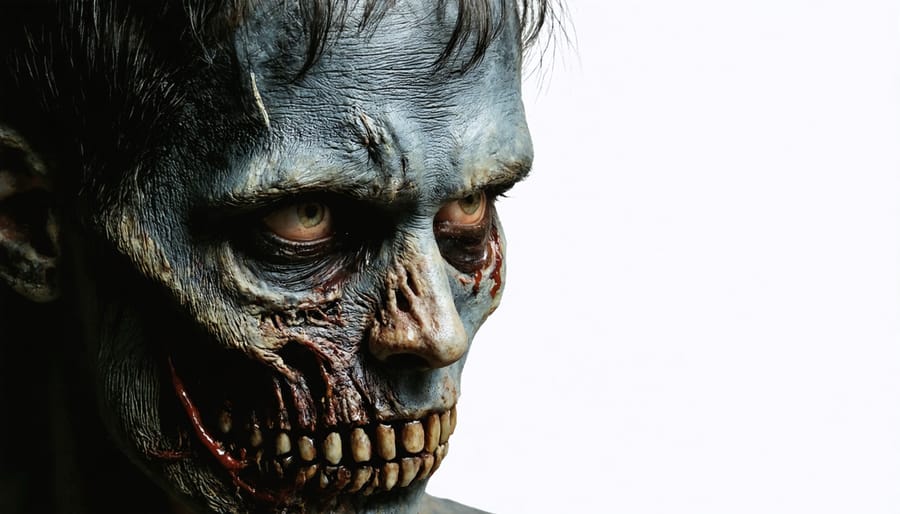
Store-bought masks can serve as an excellent foundation for creating unique zombie decorations, and with a few simple modifications, you can transform them into terrifying masterpieces. Start by roughing up the surface using sandpaper to create an aged, weathered look. Add texture by applying layers of liquid latex and tissue paper, creating realistic decomposing flesh effects.
For an extra creepy touch, use acrylic paints to add depth and dimension. Begin with a base color that matches dead flesh tones, then layer on darker shades in the hollow areas and lighter ones on raised surfaces. Don’t forget to add details like veins, wounds, or exposed bone using red, purple, and brown paint.
Consider adding three-dimensional elements like cotton balls soaked in latex for boils or tissue paper mixed with fake blood for hanging flesh. You can also enhance the mask with artificial hair, creating patchy, disheveled zombie looks. For a finishing touch, spray the completed mask with a clear sealant to protect your work and add a subtle sheen that makes the gore look fresh and wet.
Remember to work in a well-ventilated area when using latex and paints, and allow sufficient drying time between layers for the best results.
Paint and Texture Effects
Creating realistic zombie skin is easier than you might think! Start with a base of latex rubber, which you can find at most craft stores. Apply it in thin layers using a makeup sponge, focusing on areas where you want to create texture. While still wet, dab the latex with tissue paper to create that signature decomposed look.
For the perfect undead color palette, combine green, gray, and yellow face paints. Layer these colors, starting with a greenish base and adding darker shades in the hollow areas. Create depth by dry-brushing brown and black around the edges of wounds and in sunken areas. For that extra touch of authenticity, try incorporating some vintage Halloween effects like coffee grounds mixed with petroleum jelly for realistic dirt and grime.
To create convincing wounds, build up layers of wax or scar putty, leaving jagged edges. Paint the inside with deep reds and purples, then add a touch of black around the edges. For an extra gross factor, use fake blood that’s slightly congealed with cornstarch – it’ll look more realistic than straight liquid blood. Remember to seal everything with setting powder to ensure your zombie effects last through the night!
Lighting and Display Tips
Proper lighting can transform your zombie decorations from spooky to spine-chilling! For maximum impact, position your zombies where they’ll catch visitors off guard, like behind bushes or around corners. Use ground-level spotlights angled upward to create dramatic shadows that enhance your zombies’ creepy features.
Green and blue LED lights work wonderfully for creating an eerie atmosphere. Place them behind your zombie props to create silhouettes, or use them to illuminate specific areas where you want to draw attention. Battery-operated flickering lights can simulate lightning effects, adding an extra layer of creepiness to your display.
Consider motion-activated lights that trigger when someone approaches – this creates startling moments and conserves battery life. For a fog-machine setup, position the machine slightly behind your zombies and aim it low to the ground. The fog will create an atmospheric graveyard effect while concealing light sources.
Don’t forget about timing! Set your lights on timers to activate at dusk and run through the evening hours. This automation saves energy and ensures your display remains consistent. For indoor zombies, use strategic uplighting in corners and combine it with blacklights to make any UV-reactive elements glow.
Remember to weatherproof your outdoor lighting with proper covers or by placing them under eaves. Test your entire lighting setup several days before Halloween to identify any dark spots or areas that need adjustment. And always keep spare batteries and bulbs on hand – nothing ruins a zombie apocalypse quite like a power failure!
Creating zombie Halloween decorations doesn’t have to be complicated or expensive. With the materials and techniques we’ve explored, you can transform your space into a spine-chilling zombie apocalypse scene that will impress your guests. Remember to focus on key details like realistic textures, effective lighting design, and strategic placement of your creations. Whether you’re crafting simple zombie silhouettes or attempting more advanced props like animated corpses, the satisfaction of building these decorations yourself is unmatched. Don’t be afraid to experiment and add your own creative twists to these projects. With some dedication and imagination, you’ll create unforgettable Halloween decorations that will have your neighbors doing double-takes. So gather your supplies, unleash your inner special effects artist, and start bringing your zombie vision to life!