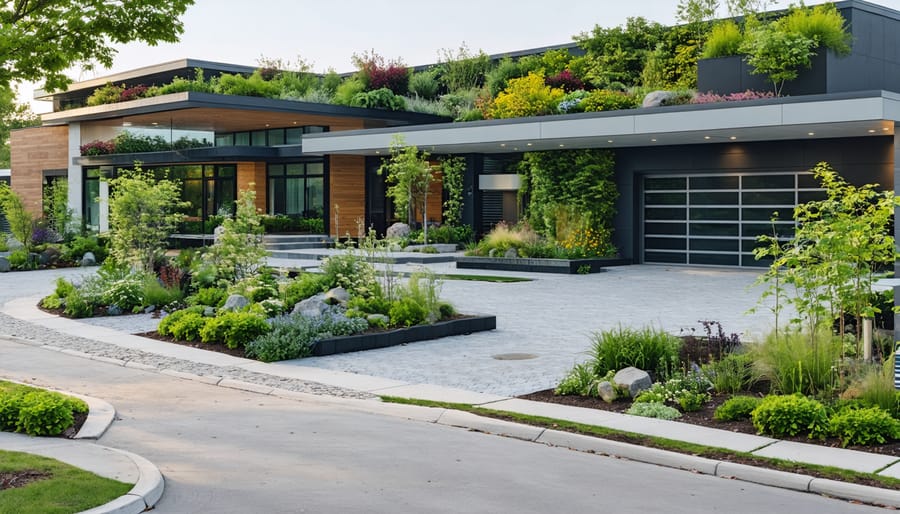
Transform your property into a sustainable urban oasis by implementing a strategic green infrastructure plan that combines eco-friendly landscaping solutions with smart water management. Install permeable pavement systems in driveways and walkways to naturally filter stormwater while reducing runoff by up to 90%. Create bioswales along property boundaries using native plants and engineered soils to capture and clean rainwater before it enters local waterways. Integrate green roofs and living walls to provide natural insulation, reducing energy costs by 23% while supporting local biodiversity.
This comprehensive approach to green infrastructure doesn’t just beautify your property – it creates a resilient ecosystem that actively fights climate change, reduces urban heat island effects, and cuts maintenance costs. By combining traditional landscaping with innovative green technology, your property becomes part of a larger solution to urban environmental challenges while increasing its value and sustainability.
Whether you’re starting from scratch or retrofitting existing spaces, green infrastructure represents a smart investment in both environmental stewardship and property enhancement. The initial planning phase focuses on maximizing environmental benefits while ensuring practical functionality for daily use.
Key Elements of Green Infrastructure for Your Property
Rain Gardens and Bioswales
Rain gardens and bioswales are beautiful solutions for sustainable water management that combine functionality with aesthetic appeal. These landscaping features work by collecting and filtering rainwater naturally, preventing flooding while creating vibrant garden spaces.
A rain garden is essentially a shallow depression in your yard that collects water runoff from roofs, driveways, or slopes. Plant it with deep-rooted native species that love both wet and dry conditions. Think of colorful perennials like black-eyed susans, purple coneflowers, and decorative grasses that add year-round interest while doing the important work of water filtration.
Bioswales are like rain gardens’ larger cousins, typically longer and designed to move water from one area to another. They’re perfect for property edges or along driveways, where they can capture and clean water while creating natural boundaries. The key is layering different types of plants – ground covers, medium-height perennials, and taller grasses – to slow water flow and maximize filtration.
Both features are surprisingly low-maintenance once established and can significantly reduce your water bills while supporting local wildlife. The best part? You can start small and expand these features as your comfort level grows.

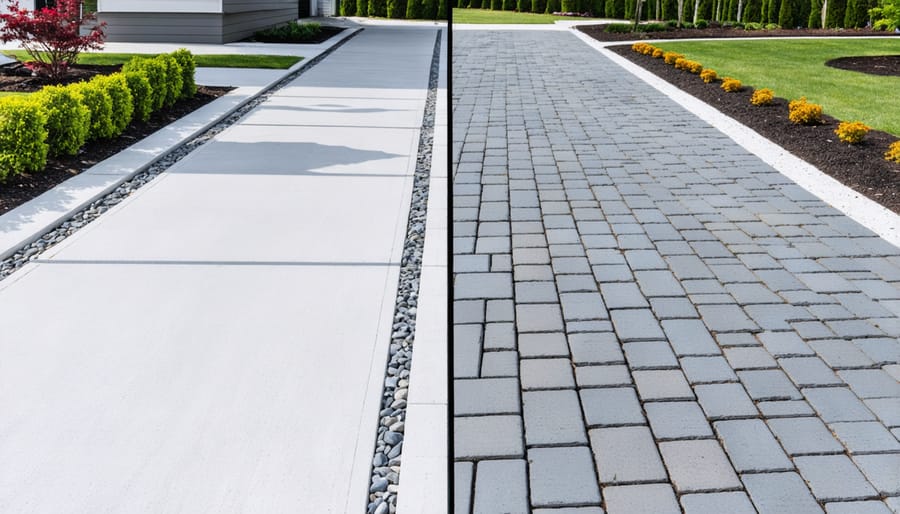
Permeable Pavements
Transforming your driveway or walkway into a permeable surface is a fantastic way to manage rainwater while creating an eco-friendly landscape. These innovative surfaces allow water to seep through rather than run off, helping prevent flooding and naturally filtering pollutants.
Popular options include permeable pavers, which come in various attractive designs and create gaps for water drainage. Gravel driveways offer a budget-friendly alternative that’s both functional and visually appealing. For a more modern look, pervious concrete provides a solid surface while maintaining excellent drainage capabilities.
When installing permeable pavements, proper base preparation is crucial. A well-designed system includes layers of differently sized stones beneath the surface to create water storage and filtration zones. While professional installation is recommended for large areas, smaller walkways can be a rewarding DIY project with careful planning and the right materials.
Remember to maintain your permeable surface by regular sweeping and occasional pressure washing to prevent clogging and ensure long-lasting performance.
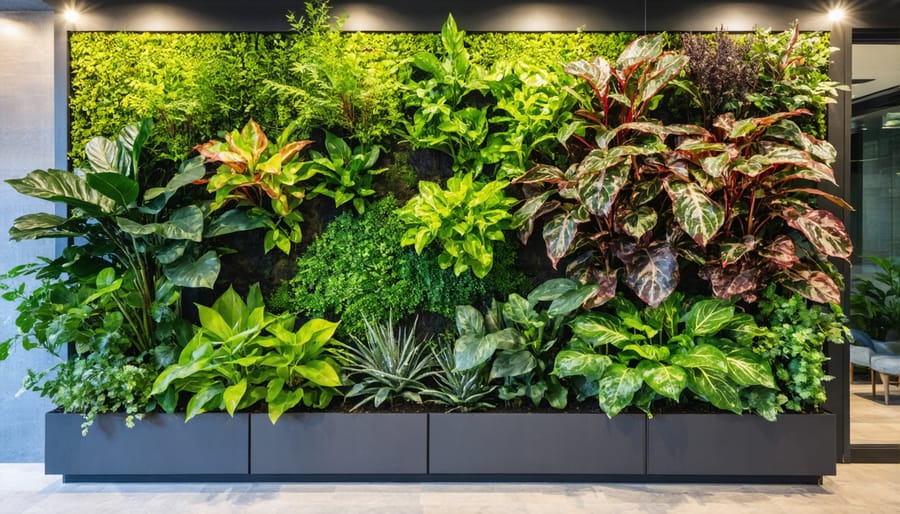
Green Roofs and Living Walls
Transform your building’s blank surfaces into thriving ecosystems with green roofs and living walls! These innovative features not only look stunning but also provide excellent insulation and help manage stormwater runoff. Green roofs involve installing a layer of vegetation on flat or gently sloped rooftops, creating a natural habitat while reducing heating and cooling costs.
Living walls, also known as vertical gardens, bring life to indoor and outdoor wall spaces. They can range from simple climbing vine systems to elaborate modular panels filled with diverse plant species. Both options help purify the air, reduce urban heat island effects, and create peaceful green spaces in urban environments.
For DIY enthusiasts, start small with a test area using drought-resistant plants like sedums for green roofs or install a basic trellis system for climbing plants. Remember to consider structural support, waterproofing, and proper drainage when planning these features. Regular maintenance, including seasonal pruning and irrigation system checks, will keep your green installations thriving year-round.
Planning Your Green Infrastructure Project
Site Assessment and Design
Before diving into your green infrastructure project, it’s essential to thoroughly assess your property and create a well-thought-out plan. Start by walking your property during both dry and rainy weather to observe natural water flow patterns, sunny and shady areas, and existing vegetation.
Make a simple sketch of your property, marking key features like buildings, existing trees, slopes, and problem areas such as flooding spots or erosion. Take measurements and photos to help with your planning process. Note the soil type in different areas – this will influence which green solutions will work best.
Consider your local climate and typical weather patterns. What’s your annual rainfall? Are there specific seasons when stormwater management is most crucial? This information will help you choose appropriate green infrastructure elements.
Next, identify your goals. Are you primarily focused on managing stormwater, creating wildlife habitat, or reducing energy costs? List these priorities to guide your design decisions.
Research local regulations and permit requirements before finalizing your plan. Some areas have specific guidelines for green infrastructure projects, particularly regarding water management and landscape modifications.
Finally, break your plan into manageable phases. This allows you to spread out costs and adjust your approach based on what works best. Remember to include maintenance requirements in your planning – even sustainable solutions need some upkeep to function effectively.
Plant Selection and Maintenance
Selecting the right plants is crucial for your green infrastructure’s success. Start by choosing native species that are well-adapted to your local climate and rainfall patterns. These plants typically require less maintenance and support local wildlife, creating a thriving ecosystem in your space.
Consider the specific conditions of your site. For sunny areas, opt for drought-resistant plants like lavender, sage, or native grasses. In shadier spots, try ferns, hostas, or woodland flowers. Remember to group plants with similar water needs together to make maintenance more efficient.
When it comes to maintenance, establish a regular care schedule. Water deeply but infrequently to encourage deep root growth, which helps plants become more resilient. Apply a layer of organic mulch around your plants to retain moisture, suppress weeds, and improve soil health over time.
Pruning is essential for keeping your green infrastructure looking its best. Remove dead or damaged growth in early spring, and shape plants as needed throughout the growing season. Pay special attention to plants near walkways or buildings to ensure they don’t obstruct movement or cause structural issues.
Monitor your plants regularly for signs of stress or disease. Early detection makes problems easier to manage and helps maintain the overall health of your green infrastructure. Consider keeping a simple maintenance log to track watering schedules, pruning dates, and any issues that arise.
Budget and Resource Planning
Planning your green infrastructure budget doesn’t have to be overwhelming. By breaking down costs and exploring available incentives, you can create an eco-friendly outdoor space that fits your financial goals. Start by researching local rebates and tax incentives – many municipalities offer significant savings for implementing sustainable home solutions like rain gardens or permeable pavements.
Consider phasing your project over several years to spread out costs. A basic rain garden might cost $500-1,500, while larger projects like green roofs typically range from $10-30 per square foot. Don’t forget to factor in long-term savings – green infrastructure can reduce water bills, minimize flood damage, and increase property value.
Look into community grants and environmental organization partnerships that might help fund your project. Many local watershed groups offer free consultations and resources. For DIY installations, you can save significantly on labor costs, though some elements may require professional expertise.
Remember to budget for maintenance – while generally lower than traditional landscaping, green infrastructure needs periodic attention. Set aside about 5-10% of your initial investment for annual upkeep. Consider starting with smaller projects like rain barrels or native plant gardens, which offer excellent returns with minimal investment. As you see the benefits, you can gradually expand your green infrastructure network.
DIY Green Infrastructure Projects
Building a Rain Garden
Creating a rain garden is an excellent way to manage stormwater while adding beauty to your yard. Start by selecting a location at least 10 feet from your house where water naturally collects or where downspouts discharge. Test your soil drainage by digging a hole 12 inches deep, filling it with water, and ensuring it drains within 24-48 hours.
Begin by measuring and marking your garden area – typically 100-300 square feet works well for most homes. Dig a shallow basin about 4-8 inches deep, creating gently sloping sides at a 3:1 ratio. The bottom should be level to ensure even water distribution.
Next, improve your soil by mixing in compost and sand to enhance drainage. Create a berm on the downhill side using the excavated soil to help contain water. Choose native plants that can handle both wet and dry conditions, arranging them in zones: place water-loving plants in the center and drought-resistant species around the edges.
Layer 2-3 inches of mulch around your plants to retain moisture and prevent erosion. Water regularly during the first growing season to help establish strong root systems. Maintain your rain garden by removing weeds, refreshing mulch annually, and trimming plants as needed.
Remember to call your utility companies before digging, and consider consulting local extension offices for native plant recommendations suited to your area.
Installing Permeable Pavers
Installing permeable pavers is an excellent way to manage stormwater while creating an attractive outdoor space. Start by marking your paving area and excavating to a depth of 8-10 inches, ensuring a slight slope away from buildings for proper drainage.
First, lay a layer of geotextile fabric to prevent soil mixing with your base materials. Next, add a 4-inch layer of crushed stone (¾-inch) as your sub-base, compacting it thoroughly with a plate compactor. Follow this with a 2-inch layer of smaller crushed stone (⅜-inch) for your bedding layer.
Now comes the fun part – laying your pavers! Begin from a corner, preferably against a fixed edge, and work your way out. Leave small gaps (about ¼ inch) between pavers for water infiltration. Use a rubber mallet to set each paver firmly in place. For curved edges, you’ll need to cut pavers using a masonry saw.
Once all pavers are placed, spread fine gravel or special permeable joint material over the surface, sweeping it into the gaps between pavers. Make several passes with the plate compactor to settle the joint material. Finally, mist the surface with water to help settle the materials further.
Remember to maintain your permeable paving by regularly sweeping debris and periodically refilling joints with appropriate material to ensure optimal water drainage.
Creating a Living Wall
Creating a living wall is an exciting way to bring nature indoors while maximizing vertical space. Start by selecting a sturdy wall that receives adequate light and can support the weight of your garden system. For beginners, we recommend using a modular pocket system, which consists of fabric pockets or plastic containers mounted on a frame.
Begin by measuring your wall space and sketching your design. Consider clustering plants with similar water and light needs together. Choose plants that thrive in vertical settings, such as pothos, ferns, peace lilies, or succulents. For outdoor walls, consider native species that match your climate.
Install a moisture barrier on your wall to prevent water damage, then mount your frame securely using appropriate anchors. Ensure proper drainage by incorporating a collection tray at the bottom. Set up an irrigation system – this can be as simple as a gravity-fed drip system or as sophisticated as an automated watering setup.
When planting, use a lightweight growing medium specifically designed for vertical gardens. Start with smaller plants and give them time to establish. Regular maintenance is key: check moisture levels weekly, trim dead foliage, and fertilize according to each plant’s needs.
Pro tip: Install your living wall in phases, starting with a small section. This allows you to perfect your maintenance routine before expanding. Remember to leave access space for maintenance and consider installing grow lights if natural light is limited.
Taking steps toward green infrastructure is more than just a trend – it’s an investment in our future and our communities. By implementing elements like rain gardens, permeable pavements, and native plantings, you’re not only enhancing your property’s value but also contributing to a more sustainable and resilient environment.
The benefits are clear: reduced stormwater runoff, improved water quality, enhanced biodiversity, and lower energy costs. Plus, you’ll create beautiful, functional spaces that connect you with nature while helping combat climate change at the local level. Even small changes, like installing a rain barrel or creating a butterfly garden, can make a significant impact.
Remember, you don’t have to tackle everything at once. Start with a simple project that matches your budget and skill level, then gradually expand your green infrastructure elements as you become more comfortable. Whether you’re a homeowner looking to transform your backyard or a renter wanting to add some green elements to your balcony, there’s always a way to contribute to a more sustainable future.
Ready to begin your green infrastructure journey? Start by assessing your space and identifying areas where you can implement these eco-friendly solutions. With proper planning, dedication, and the knowledge you’ve gained, you’re well-equipped to create a more sustainable and beautiful environment for generations to come.