Transform your cluttered closet into a beautifully organized sanctuary with a walk-in closet kit – the perfect solution for implementing smart home organization ideas without breaking the bank. Measure your space precisely, accounting for door swing clearance and walking paths, to select a kit that maximizes every square inch. Choose between modular systems offering adjustable shelving, hanging rods, and drawers to accommodate your specific wardrobe needs, or opt for comprehensive all-in-one kits that deliver a complete storage solution. Consider double-hanging sections for shirts and pants, dedicated shoe storage, and built-in hampers to create a functional space that rivals custom closets at a fraction of the cost. With options ranging from basic wire systems to luxurious melamine-coated wood designs, these DIY-friendly kits transform unused space into an organized dressing room that adds genuine value to your home.
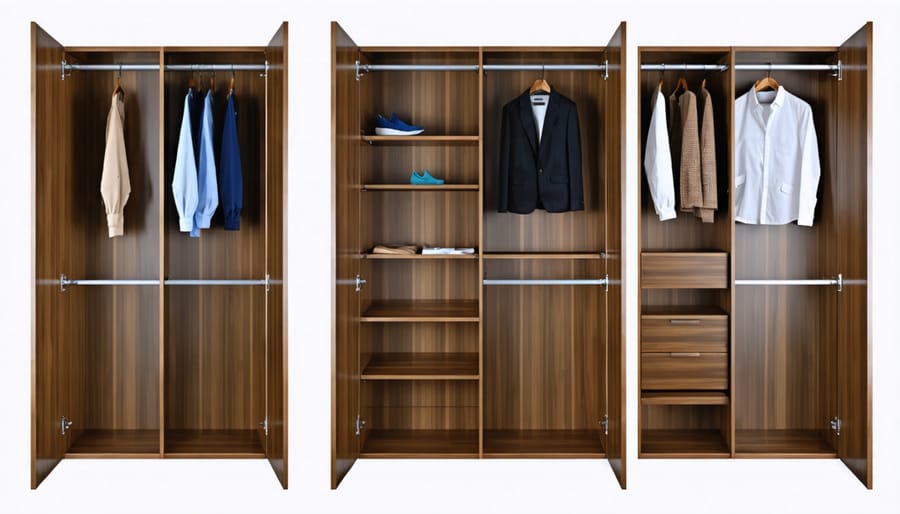
What Makes a Quality Walk-In Closet Kit
Material Quality and Durability
When it comes to walk-in closet kits, the materials used can make or break your investment. Most quality kits feature a combination of durable closet shelf materials that balance strength with aesthetic appeal.
Melamine-coated particleboard is a popular and budget-friendly option that resists scratches and moisture while providing a clean look. However, for those seeking extra durability, solid wood or metal components offer superior longevity, though at a higher price point. Look for kits featuring thick panels (at least ¾ inch) and reinforced mounting hardware to ensure stability.
High-grade wire systems, often made from powder-coated steel, offer excellent ventilation and typically last for decades with proper installation. These systems resist rust and can handle substantial weight without sagging. For hanging rods, chrome-plated or brushed nickel finishes not only look sleek but also stand up well to daily use.
The quality of hardware matters just as much as the main materials. Premium kits include metal shelf supports, adjustable leveling feet, and heavy-duty wall anchors. Watch out for plastic components in high-stress areas – they’re often the first to fail. When properly maintained, a well-made closet kit should provide reliable service for 10-15 years or more, making it a worthwhile investment in your home’s organization and value.
Installation Requirements
Installing a walk-in closet kit is a manageable DIY project that requires basic to intermediate home improvement skills. Before you begin, gather these essential tools: a power drill with various bits, level, tape measure, pencil, stud finder, screwdriver set, and hammer. You’ll also want a sturdy step ladder and safety equipment including work gloves and protective eyewear.
Most kits come with detailed instructions and all necessary hardware, but you might need additional wall anchors or screws depending on your wall type. Having a helper during installation makes the process much easier, especially when handling larger panels and hanging rods.
As for skill level, if you’re comfortable using basic tools and have experience assembling furniture, you should be able to tackle this project. The most challenging aspects typically involve ensuring everything is level and properly secured to wall studs. You’ll need to be comfortable reading measuring guides and making precise marks.
Time-wise, plan for about 4-8 hours for a complete installation, depending on the kit’s complexity and your experience level. Some basic carpentry knowledge is helpful but not essential. If you’re unsure about electrical work (for lighting) or need to modify walls, it’s best to consult a professional for those specific tasks.
Remember to clear the installation area completely and have a clean, well-lit workspace before starting. This makes the process much smoother and helps prevent accidents or damage to your new closet components.
Top Walk-In Closet Kit Systems Compared
Budget-Friendly Options
Creating a stylish walk-in closet doesn’t have to break the bank. There are several affordable best closet kits that offer excellent value without compromising on quality. Wire-based systems typically start around $100-200 and provide a practical foundation for organizing your space. These kits usually include essential components like hanging rods, shelves, and basic drawers.
For a step up in both style and durability, consider laminate or wood-veneer systems in the $300-500 range. These mid-range options often feature adjustable shelving, multiple hanging areas, and more sophisticated storage solutions. Many brands offer expandable designs, allowing you to start small and add components as your budget allows.
To maximize your investment, look for modular systems that can be customized to your space. Some budget-friendly features to prioritize include:
– Adjustable hanging rods for flexible clothing storage
– Mix-and-match shelf configurations
– Basic drawer units for folded items
– Wall-mounted options that maximize floor space
– Easy-to-install track systems
Pro tip: Watch for seasonal sales at home improvement stores, where you can often find quality kits at 20-30% off regular prices. Remember that a well-planned basic system can be just as functional as premium options, especially when thoughtfully organized. Consider starting with essential components and upgrading or expanding your closet system over time as your needs and budget evolve.
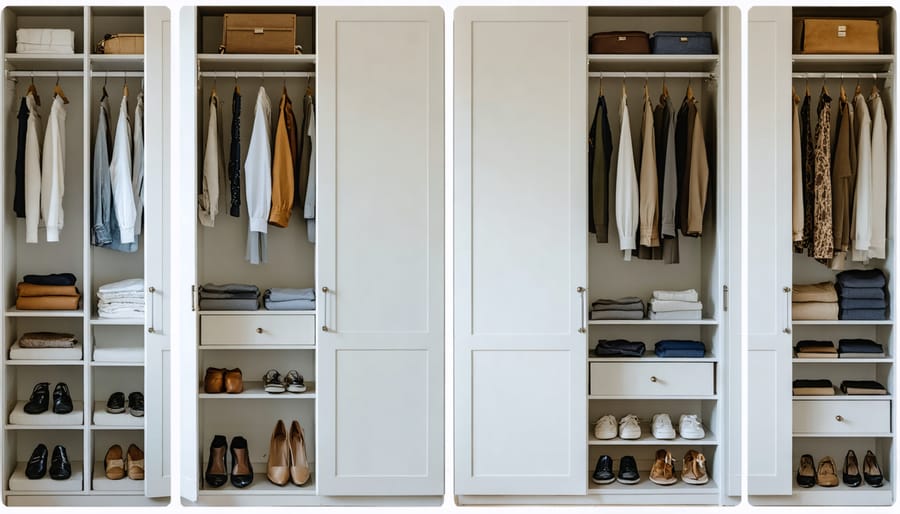
Mid-Range Solutions
Mid-range walk-in closet kits offer an excellent balance between quality and affordability, typically ranging from $500 to $1,500. These systems often feature a mix of solid wood components and high-grade laminate or melamine materials, providing durability without breaking the bank.
Popular brands like ClosetMaid’s SuiteSymphony and Rubbermaid’s HomeFree series offer customizable solutions that include adjustable shelving, multiple hanging rods, and drawer options. These kits usually come with better-quality hardware than budget options, including soft-close drawer slides and sturdy mounting brackets.
What sets mid-range kits apart is their versatility and expandability. Many systems allow you to start with a basic configuration and add components over time. You’ll typically find features like:
– Adjustable shelving with multiple finish options
– Double hanging rods with chrome or brushed nickel finish
– Built-in drawer units with dovetail construction
– Shoe storage solutions with angled shelves
– Belt and accessory organizers
– Limited lifetime warranties on most components
Installation of mid-range kits usually requires basic DIY skills and common household tools. Most manufacturers provide detailed instructions and online video tutorials to help with assembly. While these systems might not offer the premium materials of high-end options, they deliver reliable functionality and attractive aesthetics that can transform your closet space without requiring a significant investment.
Pro tip: Look for systems with wall-mounted tracks, as they offer more flexibility for future modifications compared to fixed-mount options.
Premium Systems
Premium walk-in closet kits represent the pinnacle of closet organization, offering superior materials, sophisticated design elements, and comprehensive customization options. These high-end systems typically feature solid wood construction or commercial-grade materials, with finishes ranging from rich mahogany to sleek white lacquer.
Leading brands like California Closets and Closet Factory offer complete solutions that include premium features such as soft-close drawers, LED lighting systems, and built-in jewelry organizers. You’ll find luxurious touches like velvet-lined compartments, pull-out mirrors, and dedicated spaces for accessories like belts, ties, and scarves.
What sets premium kits apart is their attention to detail and modularity. Many systems include adjustable shelving, multiple hanging rod heights, and specialized storage solutions like wine racks or shoe walls. The hardware is typically crafted from high-grade metals with sophisticated finishes like brushed nickel or oil-rubbed bronze.
While premium kits come with a higher price tag, usually starting around $3,000 and reaching upwards of $10,000, they offer exceptional durability and timeless design. Most manufacturers provide professional design consultations and installation services, though skilled DIY enthusiasts can still tackle the project themselves.
These systems often include warranties of 10 years or more, reflecting their quality construction and long-term value. When properly maintained, premium closet kits can last decades while maintaining their functionality and aesthetic appeal.
Customization and Flexibility
Measuring Your Space
Before diving into your walk-in closet kit installation, accurate measurements are crucial for success. Start by clearing out your closet space completely to access all corners and walls. Grab a tape measure, paper, and pencil – you’ll want to record every dimension carefully.
Begin with the basics: measure the width, length, and height of your space. Don’t forget to measure from floor to ceiling at multiple points, as older homes might have uneven surfaces. Pay special attention to corners, ensuring they’re square (90 degrees), as this can affect your kit’s fit.
Note the location and size of any obstacles like windows, electrical outlets, air vents, or light switches. These will impact your design choices and component placement. Measure the width of your doorway too – you’ll need this information when bringing in materials and planning your layout.
Pro tip: Create a rough sketch of your space and mark all measurements, including doors and obstacles. Take photos on your phone for reference while shopping. For optimal functionality, allow at least 24 inches of walking space between storage components.
Double-check all measurements before ordering your kit. Remember, it’s better to measure twice and order once! Consider taking measurements at different times of the day, as natural light can sometimes affect your perception of space dimensions.

Modular Components
One of the most exciting aspects of walk-in closet kits is their modular nature, allowing you to create a custom solution that perfectly fits your space and needs. These versatile components work like sophisticated building blocks, enabling you to maximize storage space while maintaining a cohesive look throughout your closet.
Most kits offer essential components like hanging rods, shelving units, drawers, and shoe racks that can be mixed and matched to your heart’s content. Want more drawer space? Simply add extra drawer units. Need additional hanging space for longer garments? Extend your hanging sections with supplementary rods and supports.
The beauty of modular systems lies in their flexibility. As your storage needs change over time, you can easily reconfigure your layout or add new components without replacing the entire system. Many manufacturers design their components to be completely interchangeable, allowing you to start with a basic setup and gradually expand as your budget allows.
Look for kits that offer accessories like belt hooks, tie racks, jewelry trays, and pull-out hampers to truly personalize your space. Some systems even include adjustable shelving heights and convertible hanging spaces, ensuring your closet can evolve with your changing wardrobe needs. Remember, the key to a successful modular closet is choosing components that work together seamlessly while addressing your specific storage requirements.
Installation Tips and Common Pitfalls
Pre-Installation Preparation
Before building your dream closet, proper preparation is essential for a smooth installation process. Start by thoroughly measuring your space, including the room’s height, width, and depth. Don’t forget to account for baseboards, door frames, and any architectural features that might affect the kit’s fit.
Clear the installation area completely and clean all surfaces, including walls and floors. This is also the perfect time to repair any wall damage and touch up paint if needed. Gather all necessary tools, which typically include a level, drill, screwdriver, measuring tape, and pencil. Many kits come with basic hardware, but double-check your package contents against the installation guide to ensure nothing’s missing.
Review your electrical outlets’ locations and consider whether you’ll need additional lighting. If you’re planning to add new electrical features, consult an electrician before beginning installation. Finally, sort through your existing closet items to determine the most efficient organization system for your needs – this will help you make the most of your new storage space.
Installation Best Practices
Before starting your installation, carefully measure your space twice and lay out all components for easy access. A successful installation begins with a clean, decluttered room and proper wall preparation – check for studs and mark their locations clearly.
Start by installing the mounting brackets or rails at the correct height, ensuring they’re perfectly level. Most kits come with a mounting template, which can be invaluable for accuracy. Always use a level and don’t skip this crucial step, as it affects the entire installation.
When assembling components, work systematically from one side to the other rather than jumping around. This method helps maintain stability and makes it easier to spot any potential issues early on. Hand-tighten all screws initially, then go back for final tightening once everything is properly aligned.
For heavy-duty sections like hanging rods and shelving units, ensure you’re anchoring into studs whenever possible. If you must use wall anchors, choose ones rated for the weight you’ll be storing. Don’t forget to account for future storage needs when considering weight capacity.
Remember to adjust shelves and rods to your preferred heights before loading items into your new closet system. Take time to double-check all connections and weight-bearing elements for security.

Avoiding Common Mistakes
When installing walk-in closet kits, even small mistakes can lead to frustrating results. One common error is not measuring your space accurately – always measure twice and write down all dimensions, including ceiling height and door clearance. Don’t forget to account for baseboards and any heating vents in your planning.
Another frequent mistake is overloading the hanging rods and shelves beyond their weight capacity. Always check the manufacturer’s specifications and distribute weight evenly. Many DIYers also skip the critical step of locating wall studs, which can lead to unstable installations. Use a stud finder and mark all mounting points before beginning.
Rushing through the planning phase is a recipe for disaster. Take time to consider your storage needs and daily routines before finalizing your design. Avoid installing components too close together – leave adequate space for hangers and accessibility. Also, don’t overlook lighting needs; poor visibility can make your beautifully organized closet frustrating to use.
Lastly, keep your receipt and installation instructions. Many people discard these important documents, only to need them later for warranty claims or adding matching components.
Walk-in closet kits offer an excellent solution for transforming unused space into an organized, functional storage area that adds value to your home. Whether you’ve chosen a budget-friendly wire system or invested in a premium solid wood kit, these versatile solutions can be customized to meet your specific needs and space requirements.
Remember to carefully assess your space, storage needs, and budget before making your final selection. Consider factors like durability, adjustability, and installation requirements to ensure you choose a kit that will serve you well for years to come. Don’t forget to measure your space multiple times and account for doors, windows, and electrical outlets during the planning phase.
For the best results, take time to properly prepare your space before installation, including cleaning, repairing walls, and gathering all necessary tools. While many kits are designed for DIY installation, don’t hesitate to seek professional help if you’re unsure about any aspect of the project.
By investing in a quality walk-in closet kit and following proper installation procedures, you can create a beautiful, organized space that maximizes storage efficiency and enhances your daily routine. Whether you’re a fashion enthusiast, minimalist, or somewhere in between, the right walk-in closet kit can transform your storage space into an organized haven that perfectly suits your lifestyle and needs.