Transform your home with the timeless beauty of hand-dyed textiles, where vibrant colors and unique patterns merge with traditional textile crafts to create one-of-a-kind pieces. Master artisans have perfected these techniques over centuries, combining natural dyes with precise application methods to produce stunning results that breathe life into any space. From rich indigo-dipped linens to delicate shibori patterns on silk, hand-dyeing offers unlimited possibilities for personalizing your home décor. Whether you’re drawn to the meditative process of bundle dyeing or the precise art of resist techniques, this ancient craft allows you to infuse your living spaces with authentic, artisanal character while expressing your unique creative vision. Modern DIY enthusiasts are rediscovering these time-honored methods, adapting them for contemporary homes while preserving the soulful connection between maker and material that makes hand-dyed textiles so special.
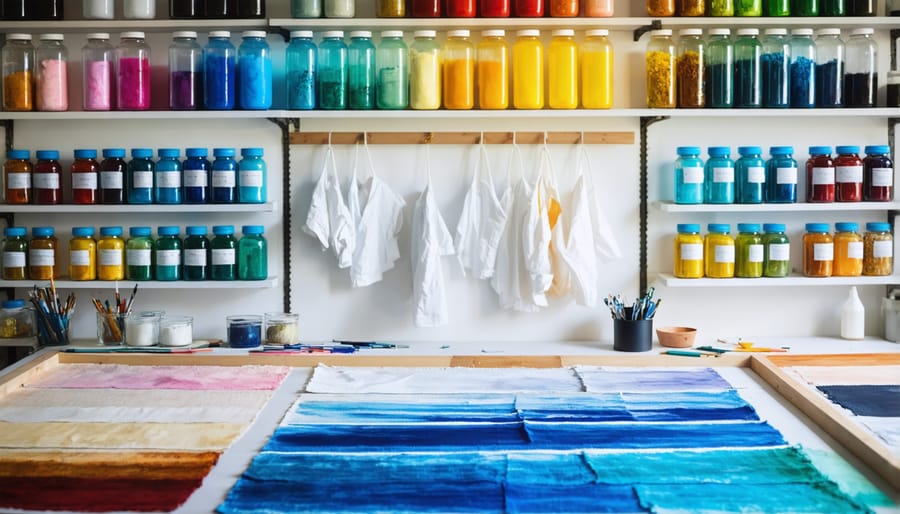
Essential Materials and Setup for Hand-Dyeing
Choosing Your Fabrics
The foundation of successful hand dyeing starts with choosing the right fabric. Natural fibers like cotton, linen, and silk are excellent choices as they readily accept dyes and produce vibrant results. Cotton is particularly beginner-friendly, offering good color absorption while being affordable and easy to work with. Silk, though more expensive, creates stunning color variations and has an unmatched luminosity when dyed.
For those just starting out, consider working with white or light-colored fabrics, as they provide the cleanest canvas for your dye work. Pre-washing your fabric is essential to remove any sizing or finishing agents that might interfere with the dye absorption.
Different fabric weights also play a role in the final outcome. Lightweight fabrics like gauze or muslin create ethereal effects with dye, while heavier materials like canvas or denim produce more saturated, uniform results. The fabric’s weave pattern can create interesting effects too – looser weaves often result in more organic, watercolor-like patterns, while tight weaves give sharper, more defined results.
Remember that synthetic fabrics like polyester typically don’t accept natural dyes well, so stick to natural fibers for the best results.
Dyes and Tools
To get started with hand dyeing textiles, you’ll need both natural and synthetic dyes. Natural options include indigo, madder root, and turmeric, while synthetic dyes like fiber-reactive and acid dyes offer vibrant, lasting colors. Each type requires specific handling and preparation methods.
Essential tools include large stainless steel or plastic containers for dye baths, measuring cups and spoons dedicated to dyeing, stirring rods, and rubber gloves. A basic kit should also include squeeze bottles for precise application, rubber bands for tie-dye techniques, and plastic drop cloths to protect your work surface.
Safety should always come first when working with dyes. Protective gear is non-negotiable: wear rubber gloves, a dust mask when handling powdered dyes, and an apron or old clothes. Good ventilation is essential, especially when working with hot dye baths or chemical fixatives.
Additional helpful tools include a thermometer for monitoring dye bath temperatures, pH testing strips, and natural or chemical mordants to help the dye bond with fabrics. For beginners, starting with a basic kit containing pre-measured dyes and essential tools is recommended.
Setting Up Your Workspace
Before diving into your dyeing adventure, set up a dedicated workspace that’s both safe and practical. Choose a well-ventilated area, ideally with access to water and plenty of natural light. Your garage, basement, or outdoor space can work perfectly. Cover your work surface with a waterproof drop cloth or plastic sheeting to protect against spills.
Keep essential safety gear within reach: rubber gloves, a face mask, and an apron or old clothes you don’t mind staining. Organize your tools on a separate table or tray, keeping dyes, fixatives, and measuring equipment easily accessible but away from your main working area.
Set up multiple bins or buckets for your dyeing process – one for the dye bath, another for rinsing, and a third for fixing solutions. Having a designated spot for drying your textiles, like a clothesline or drying rack, completes your workspace setup.
Popular Hand-Dyeing Techniques
Shibori and Tie-Dye
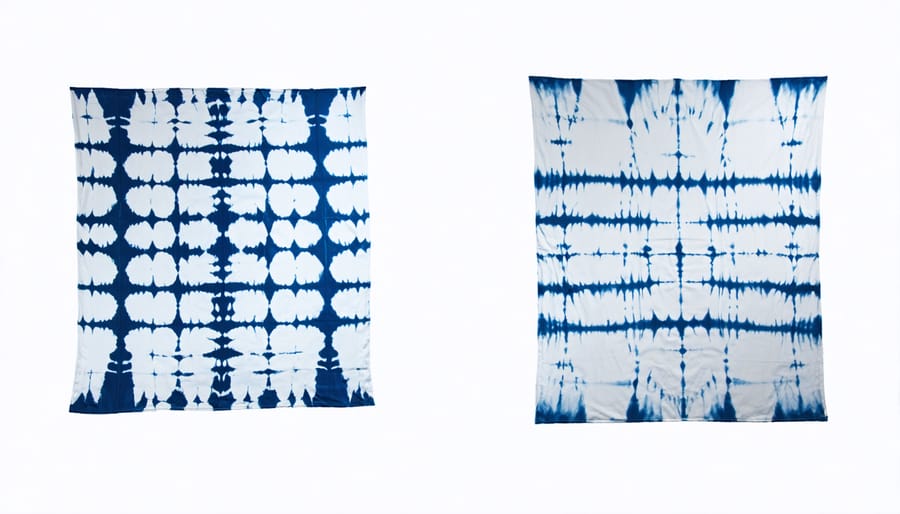
Shibori and tie-dye are ancient fabric manipulation techniques that create stunning patterns through folding, binding, and dyeing. While both methods share similar principles, shibori, originating from Japan, offers more intricate and precise patterns through specialized folding techniques.
To get started with shibori, you’ll need natural fabric (cotton or silk works best), dye, rubber bands, and wooden blocks or poles. The magic lies in how you fold and bind the fabric before dyeing. Popular techniques include kanoko (creating circles by binding small points), arashi (pole-wrapping for diagonal patterns), and itajime (folding and pressing between wooden blocks).
Like natural eco-dyeing techniques, shibori and tie-dye work beautifully with both synthetic and natural dyes. For beginners, try the simple spiral pattern: pinch the center of your fabric, twist it into a spiral, and secure with rubber bands radiating from the center. This creates a classic sunburst design that’s perfect for throw pillows or wall hangings.
Remember that the tighter you bind your fabric, the more defined your patterns will be. Start with lighter colors and gradually work your way to darker shades – this allows you to build depth and dimension in your designs. The beauty of these techniques lies in their uniqueness; no two pieces will ever be exactly alike, making each creation truly special.
Dip-Dyeing and Ombré
Dip-dyeing and ombré effects are among the most captivating textile art traditions, creating stunning gradients that can transform any fabric into a work of art. To achieve these beautiful transitions, start by preparing your fabric by pre-washing it and mixing your dyes according to package instructions.
For a classic ombré effect, begin by dipping the bottom portion of your dampened fabric into the dye bath, holding it in place for several minutes. Gradually pull the fabric up, inch by inch, allowing less time for the higher portions to absorb the dye. This creates that signature fade from dark to light.
For multi-colored dip-dye effects, prepare separate dye baths and work from lightest to darkest colors. Dip different sections of your fabric into each color, slightly overlapping the sections to create smooth transitions. Remember to let each color set before moving on to the next to prevent unwanted mixing.
Pro tip: Use rubber bands or clips to section off your fabric for more controlled color transitions. For the most vibrant results, maintain your dye bath at the recommended temperature and gently agitate the fabric occasionally to ensure even coverage.
Always finish by rinsing your fabric thoroughly in cold water until the water runs clear, then wash it separately for the first few washes to prevent color bleeding.
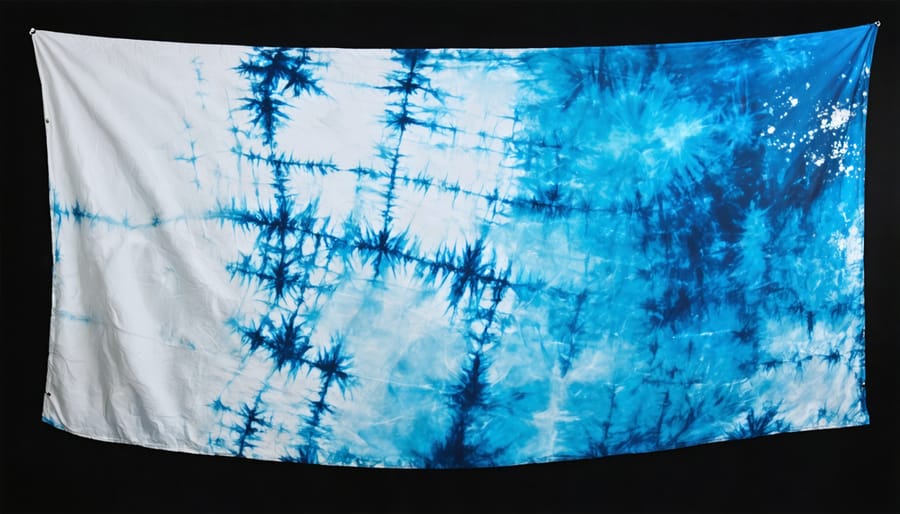
Ice Dyeing
Ice dyeing is a magical technique that creates unpredictable, crystalline patterns reminiscent of watercolors or tie-dye. The process begins by dampening your fabric and arranging it in gentle folds or crumples on a raised rack. Cover the fabric completely with ice cubes or crushed ice, then sprinkle powdered fiber-reactive dyes over the ice in your chosen colors.
As the ice slowly melts, it carries the dye powder down through the fabric layers, creating beautiful organic patterns and color blends that are impossible to achieve through traditional dyeing methods. The random movement of water as the ice melts results in stunning marbled effects and unexpected color combinations.
For best results, use three complementary colors and resist the urge to use too many dyes at once. Popular color combinations include indigo and turquoise for ocean-inspired patterns, or warm yellows and oranges for sunset effects. Allow the ice to melt completely at room temperature, which typically takes 4-6 hours.
Once melted, let the fabric sit for an additional 24 hours to ensure maximum dye absorption. After processing, rinse the fabric thoroughly in cold water until the water runs clear, then wash separately before use. Each ice-dyed piece is unique, making this technique perfect for creating one-of-a-kind home textiles like pillow covers, table runners, or wall hangings.
Block Printing and Resist Methods
Block printing and resist methods offer exciting ways to create unique patterns on your hand-dyed textiles. These techniques allow you to add intricate designs and personal touches that make your pieces truly special.
For block printing, start by carving your design into materials like linoleum, wood, or even potatoes for simple patterns. Apply fabric paint or dye to your stamp using a foam brush, then press firmly onto your fabric in a consistent manner. Pro tip: Practice your stamping pattern on paper first to perfect your technique and spacing.
Resist methods create patterns by blocking dye from reaching certain areas of the fabric. The most common technique is batik, which uses wax as a resist. Apply hot wax to your fabric using tools like tjanting (a special pen-like tool) or stamps, then dye the fabric. When you remove the wax, you’ll reveal beautiful patterns where the dye couldn’t penetrate.
Another popular resist method is tie-dye, where you fold, twist, or bind fabric before dyeing. Try using rubber bands, string, or wooden blocks to create various effects. For a more controlled look, try shibori – a Japanese resist technique that involves folding and clamping fabric to create geometric patterns.
Remember to pre-wash your fabric and work in a well-ventilated area. Always test your techniques on sample pieces before tackling larger projects.
Styling Your Hand-Dyed Creations
Window Treatments
Transform your living spaces with hand-dyed window treatments that add personality and artistic flair to any room. Curtains and drapes made from hand-dyed fabrics create stunning focal points while filtering natural light in unique ways throughout the day. For a cohesive look, consider using gradient-dyed fabrics that transition from light to dark, creating a watercolor effect when sunlight streams through.
When selecting fabric for window treatments, choose natural fibers like cotton, linen, or silk, as these materials accept dye beautifully and hang well. Light to medium-weight fabrics work best, allowing for gentle movement while maintaining their shape. For maximum impact, try dip-dying techniques to create ombré effects, or experiment with shibori patterns for a more dramatic statement.
Remember to pre-wash your fabric before dyeing and ensure proper color fastness by using appropriate fixatives. For rooms with direct sunlight, opt for colorfast dyes and consider backing your hand-dyed curtains with light-blocking material to prevent fading. This also helps protect your artistic creation while providing better light control.
Pro tip: Before committing to a full set of curtains, test your dying technique on smaller fabric samples to perfect your desired pattern and color intensity.
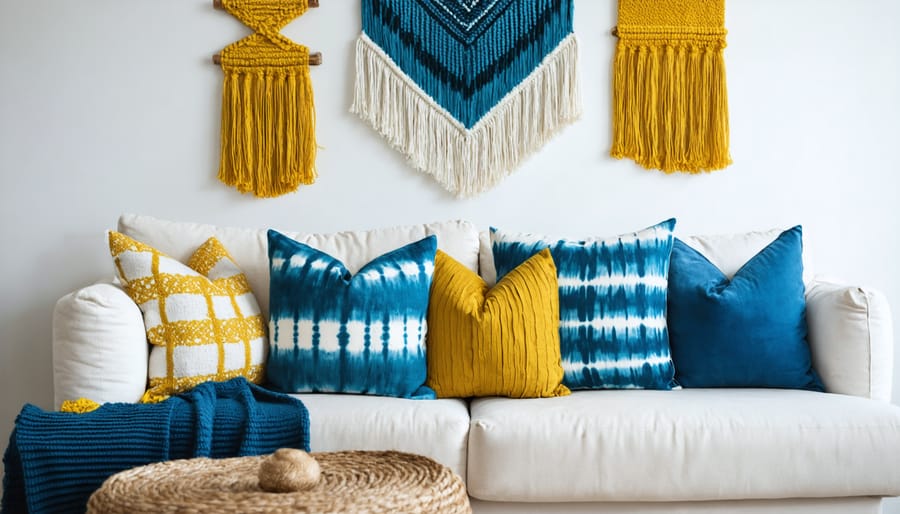
Soft Furnishings
Hand-dyed textiles bring a stunning personal touch to your home’s soft furnishings, transforming ordinary pieces into unique works of art. Throw pillows are perhaps the easiest way to start – their smaller size makes them perfect for experimenting with different dye patterns and techniques. Consider creating an ombré effect on pillow covers or trying a shibori-inspired design for eye-catching accent pieces.
Throws and blankets offer larger canvases for your creativity, allowing you to make bold statements in your living spaces. Natural fibers like cotton and linen take dye beautifully and can be transformed into cozy accessories that tell a story. For best results, pre-wash your throws to remove any sizing or protective coatings before dyeing.
When it comes to upholstery, start small with removable seat cushions or ottoman covers before tackling larger pieces. Remember that upholstery fabric needs to be sturdy enough to withstand regular use, so choose your base materials carefully. Cotton duck or heavyweight linen make excellent choices for hand-dyeing upholstery projects.
For all soft furnishings, consider how the colors will work with your existing decor. Test your dye techniques on fabric samples first, and always use colorfast dyes specifically designed for home textiles to ensure your pieces maintain their beauty through regular use and washing.
Wall Art and Hangings
Transform your hand-dyed textiles into stunning wall art that adds personality and color to any room. Large fabric panels can create dramatic focal points, while smaller pieces work beautifully in gallery-style arrangements. Consider mounting your dyed fabrics on stretcher bars, similar to canvas paintings, for a professional look that keeps the textile taut and wrinkle-free.
Create eye-catching wall hangings by incorporating different techniques like shibori or tie-dye into your design. Geometric patterns work particularly well for modern spaces, while flowing, organic designs can add a bohemian touch. Try hanging your pieces using wooden dowels with leather straps for a contemporary finish, or opt for vintage-inspired wall tapestry rods for a more traditional appearance.
Don’t limit yourself to flat hangings – experiment with three-dimensional elements by gathering, pleating, or draping your dyed fabrics. Layer different pieces to create depth and visual interest, or combine multiple panels for a statement installation. Remember to position your textile art away from direct sunlight to prevent fading and preserve the vibrancy of your hand-dyed creations.
For smaller spaces, consider creating a series of framed pieces using your dyed fabrics as the backdrop for embroidery or appliqué work. This combination of techniques adds texture and complexity to your wall art while showcasing the beauty of your hand-dyed textiles.
Table Linens
Transform your dining experience with hand-dyed table linens that add a personal touch to every meal. Tablecloths serve as your canvas, offering expansive surfaces perfect for creating stunning color gradients or bold patterns. Consider dip-dyeing the edges of a natural linen tablecloth for an ombré effect that transitions beautifully from deep to light hues.
Table runners provide an excellent starting point for beginners, requiring less fabric while making a striking impact. Try accordion-folding your runner before dyeing to create mesmerizing geometric patterns, or experiment with resist techniques using rubber bands for a modern shibori look.
Napkins are perhaps the most versatile pieces to dye, allowing you to create coordinated sets or mix-and-match designs. Start with small batches of four to six napkins to perfect your technique. Natural fibers like cotton and linen take dye beautifully and become more charming with each wash.
For special occasions, consider dyeing place cards or napkin rings to complement your table linens. Remember to pre-wash all fabrics to remove sizing and ensure even dye absorption. This extra step will result in richer, more consistent colors that last through many memorable meals.
Care and Maintenance
Taking proper care of your hand-dyed textiles ensures their beauty and longevity. Start by washing your pieces separately for the first few times, as some excess dye may bleed during initial washes. Use cool water and a gentle, pH-neutral detergent specifically designed for eco-friendly fabric care.
Always turn your items inside out before washing to protect the dyed surface. Hand washing is ideal, but if you must use a machine, select the gentlest cycle available. Avoid harsh agitation or wringing, which can damage both the fibers and the dye work. Instead, gently squeeze out excess water and roll the item in a clean white towel to absorb moisture.
When drying your hand-dyed textiles, keep them out of direct sunlight to prevent fading. Lay them flat to dry whenever possible, as hanging can distort the shape of heavier pieces. If you need to iron your textiles, do so while slightly damp and use the appropriate temperature setting for your fabric type. Place a pressing cloth between the iron and the dyed surface to protect the colors.
For storage, avoid plastic containers which can trap moisture and lead to mildew. Instead, wrap your pieces in acid-free tissue paper and store them in a cool, dry place. If you’re storing multiple items together, separate them with white cotton sheets to prevent color transfer.
Regular maintenance includes gentle spot cleaning when needed and periodic refreshing of folds to prevent permanent creasing. For delicate or particularly valuable pieces, consider professional cleaning services that specialize in handcrafted textiles. With proper care, your hand-dyed textiles can remain vibrant and beautiful for years to come.
Hand-dyeing textiles opens up a world of creative possibilities that simply can’t be matched by mass-produced fabrics. From creating unique home decor pieces to crafting personalized gifts, the art of hand-dyeing allows you to express your creativity while adding character to your living spaces. Whether you’re drawn to the precise patterns of shibori, the organic beauty of tie-dye, or the subtle elegance of natural dyes, there’s a technique that will speak to your artistic vision.
Remember that hand-dyeing is as much about the journey as it is about the final product. Don’t be afraid to experiment with different colors, techniques, and materials. Each piece you create will be uniquely yours, telling its own story through color and pattern. Start small with simple projects like napkins or pillowcases, and gradually work your way up to larger pieces as your confidence grows.
The beauty of hand-dyeing lies in its accessibility – you don’t need expensive equipment or formal training to begin. With basic supplies, some patience, and a willingness to learn, you can transform ordinary textiles into extraordinary works of art. Take inspiration from traditional techniques while developing your own signature style.
So gather your materials, set up your workspace, and let your creativity flow. The world of hand-dyed textiles awaits, ready to bring color, texture, and personal expression into your home. Your next masterpiece is just a dye bath away!