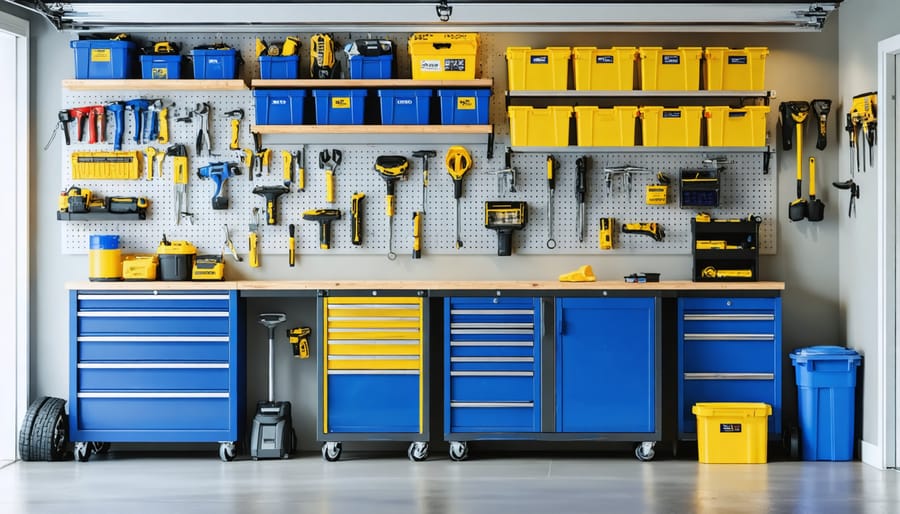
Transform your cluttered garage into an organized powerhouse with strategic zones, vertical storage solutions, and essential DIY skills. Mount pegboards on empty wall spaces to display frequently used tools, install adjustable ceiling storage racks for seasonal items, and create dedicated workstations using modular shelving systems. Custom-built storage solutions maximize every square inch while keeping items accessible and protected from moisture and dust.
Clear plastic bins with detailed labels eliminate searching through cardboard boxes, while magnetic strips secure metal tools and create instant visibility. Wall-mounted track systems with adjustable hooks and brackets adapt to changing storage needs throughout the year. Simple wooden pallets transform into vertical garden tool organizers, and overhead pulley systems make seasonal storage effortless.
This practical approach to garage organization combines smart space utilization with budget-friendly DIY solutions, ensuring every tool, box, and piece of equipment has its designated spot. Whether you’re a weekend warrior or serious DIY enthusiast, these organization methods scale to fit your specific needs and available space.
Smart Vertical Storage Solutions
Wall-Mounted Storage Systems
Transform your garage walls into efficient storage powerhouses with wall-mounted systems that maximize vertical space. Pegboards are a classic DIY solution that’s both versatile and budget-friendly. Start by mounting a sheet of pegboard onto your garage wall using furring strips to create the necessary spacing behind the board. Once secured, you can customize your pegboard with an array of hooks, baskets, and shelves to store everything from garden tools to sports equipment.
For a more modern approach, consider installing a slatwall system. While slightly more expensive than pegboards, slatwalls offer superior strength and a cleaner look. You can create your own DIY slatwall by mounting horizontal PVC boards or metal tracks to your wall studs, spacing them about 3 inches apart. This system works beautifully for hanging heavy items and accommodating various storage accessories.
Custom shelving solutions offer another excellent way to utilize wall space. Build basic floating shelves using brackets and plywood, or create a more sophisticated system with adjustable heights using vertical standards and brackets. For frequently used items, consider installing pull-out shelves that give you easy access while keeping everything organized.
Pro tip: Before mounting any wall storage system, always locate and mark your wall studs. Use a level to ensure straight installation, and consider the weight capacity of both your chosen system and your garage walls. Paint or seal wooden components to protect against moisture, and leave enough space between storage zones for easy access to all your items.

Ceiling Storage Innovations
Looking up at your garage ceiling, you’ll find a goldmine of untapped storage potential. Overhead storage solutions are perfect for seasonal items, holiday decorations, and rarely-used equipment that you want to keep but don’t need regular access to.
Installing overhead storage racks is a weekend project that can dramatically increase your storage space. Most ceiling-mounted racks can hold between 250-600 pounds when properly installed into ceiling joists. Before installation, always check your ceiling structure and ensure you have adequate clearance for your garage door operation.
For a more budget-friendly option, consider installing a simple pulley system. These mechanical aids make it easy to hoist bikes, kayaks, or storage bins up and out of the way. The beauty of pulley systems is that they allow you to lower items safely whenever needed, without requiring a ladder.
Here’s a quick guide to maximize your ceiling storage:
1. Map out your ceiling space, noting joists and lighting fixtures
2. Choose areas that won’t interfere with garage door movement
3. Install heavy-duty racks for plastic bins and large items
4. Use pulley systems for frequently accessed seasonal equipment
5. Label everything clearly from below for easy identification
Pro tip: Consider installing LED strip lighting around your ceiling storage areas. This helps you see items clearly and adds a modern touch to your garage. For safety, always check weight limits and ensure proper installation of all overhead systems. Regular inspection of mounting hardware will help maintain the security of your ceiling storage solution.
Remember to keep your most frequently used items in more accessible locations and reserve overhead storage for true seasonal items.
Workbench and Tool Organization
DIY Workbench Projects
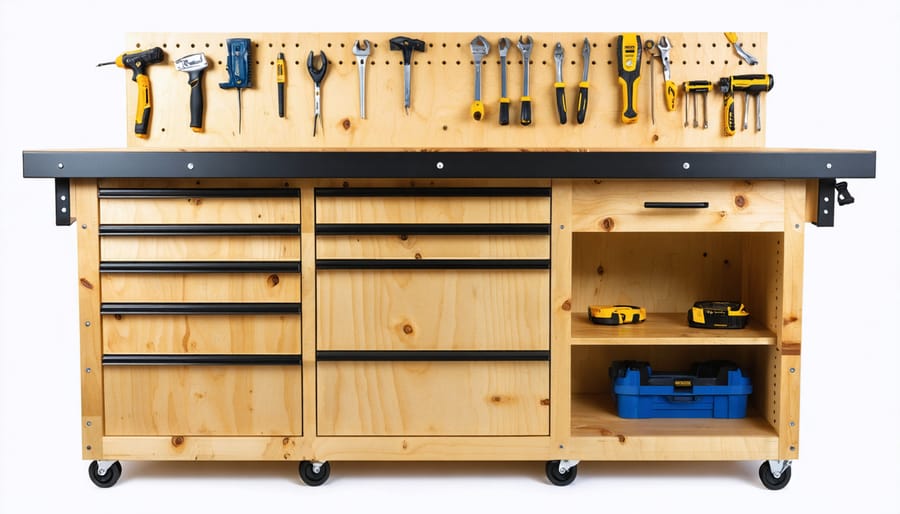
A well-built workbench is the heart of any organized garage, and custom workbench building doesn’t have to be complicated. Here’s a straightforward guide to creating your perfect workspace with built-in storage.
Basic Workbench with Lower Shelf
Materials needed:
– 2×4 lumber for frame
– 3/4″ plywood for top and shelf
– Wood screws
– Wood glue
– Wheels (optional)
Start by building a rectangular frame using 2x4s, measuring 6 feet long by 2 feet deep. Create legs at each corner, leaving 36 inches for working height. Add support beams across the back and sides for stability. Install the plywood top, securing it with screws and glue. Add a lower shelf using the remaining plywood for additional storage space.
Advanced Storage Workbench
For more organization, consider these add-ons:
1. Pegboard backing: Mount a pegboard above the workspace for hanging tools
2. Pull-out drawers: Install drawer slides under the workspace
3. Built-in power strip: Mount along the back edge
4. Adjustable shelving: Add vertical supports with multiple shelf positions
Pro Tips:
– Use a durable finish or coating to protect the surface
– Install rubber mat on top for grip and protection
– Add LED strip lighting underneath upper storage
– Include a vise mount on one corner
– Consider fold-down extensions for extra workspace
For maximum functionality, incorporate modular storage solutions like:
– Small parts bins
– Tool holders
– Magazine-style lumber storage
– Magnetic strips for metal tools
– Labeled containers for hardware
Remember to measure your space carefully before starting and allow room for movement around your workbench. Consider your most common projects when planning storage solutions, and don’t forget to include space for future tools and materials.
Tool Storage Solutions
Keeping your tools organized not only saves time but also extends their lifespan. Let’s explore some clever storage solutions that will transform your cluttered garage into an efficient workspace.
Magnetic tool storage is a game-changer for organizing smaller metal tools. Install magnetic strips along your walls to hold screwdrivers, wrenches, and other metallic tools. This solution keeps frequently used items visible and easily accessible while making use of vertical space. For added organization, consider color-coding your magnetic strips based on tool types or frequency of use.
Custom pegboard systems offer ultimate flexibility for tool storage. Create a personalized wall organization system using pegboard panels and various hooks. Outline your tools on the board with a marker to ensure everything returns to its designated spot. Pro tip: Leave some empty space for future additions to your tool collection.
Mobile tool carts are perfect for those who like to work in different areas of the garage. Choose a cart with multiple tiers and add drawer organizers to keep smaller items sorted. Consider installing rubber mat liners in the drawers to prevent tools from sliding around. For frequently used tools, dedicate the top shelf for quick access.
For power tools, build a custom storage cabinet with charging stations. Include dedicated spaces for batteries and chargers, and add labels to keep track of which battery belongs to which tool. Installing clear bins on the cabinet doors helps store smaller accessories and bits organized by tool type.
Don’t forget about vertical storage solutions. Install heavy-duty hooks or tool hangers for larger items like rakes, shovels, and extension cords. Use PVC pipe sections mounted horizontally to create individual slots for long-handled tools. This approach maximizes wall space while keeping tools easily accessible and preventing damage from leaning against walls.
Remember to position your most frequently used tools at eye level for convenient access, while storing seasonal or rarely used items higher up or in less accessible areas.
Zone-Based Organization Systems
Sports Equipment Zone
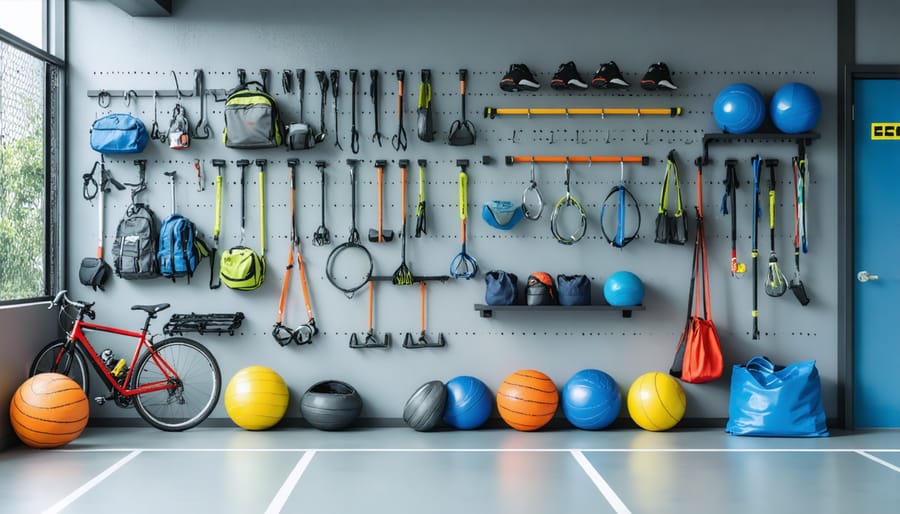
Taming your sports equipment can be a game-changer for garage organization. Let’s start with vertical bike storage – wall-mounted hooks or pulley systems can keep bikes off the floor while making them easily accessible. For a budget-friendly option, install heavy-duty utility hooks into wall studs, or create a DIY bike rack using wooden pallets mounted horizontally.
For balls and smaller equipment, try creating a custom ball corral using bungee cords stretched between hooks on a wooden frame. This flexible storage solution allows easy access while keeping balls contained. Alternatively, install wire baskets at different heights for sorting balls by sport or size.
Seasonal gear requires special attention. Build an overhead platform using sturdy brackets and plywood to store off-season equipment like skis, snowboards, or camping gear. For frequently used items, install a pegboard wall system with various hooks and attachments. This modular solution lets you reconfigure storage as your needs change.
Make use of corners by installing a floor-to-ceiling pole system with adjustable brackets for items like baseball bats, hockey sticks, and fishing rods. Add mesh bags or nets hung from the ceiling for lightweight items like soccer balls and footballs.
Pro tip: Create a dedicated “grab-and-go” zone near the garage door for regularly used equipment. Install hooks at kid-friendly heights to encourage young athletes to maintain organization. Label everything clearly and consider using clear bins for small accessories like gloves, protective gear, and spare parts.
Remember to leave floor space for maneuvering and ensure all mounted storage can support the weight of your equipment safely.
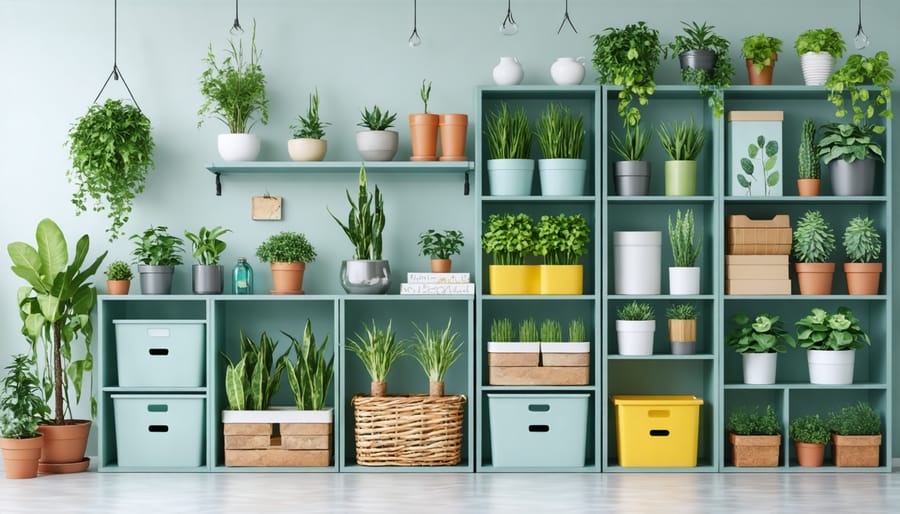
Garden Tools Zone
Creating a dedicated zone for your garden tools and lawn care equipment not only keeps your garage organized but also helps protect your investment in these essential items. Start by implementing smart garden tool organization solutions that maximize vertical space while keeping everything easily accessible.
Install a pegboard wall system to hang lightweight tools like trowels, pruning shears, and garden gloves. Add hooks at varying heights to accommodate tools of different sizes. For longer items such as rakes, shovels, and hoes, create a simple DIY tool holder using PVC pipes mounted horizontally on the wall. This keeps them upright and prevents them from falling over.
Consider building a rolling garden cart for frequently used items – it’s perfect for storing hand tools, seed packets, and small pots while being easily movable. For power equipment like lawn mowers and leaf blowers, designate a specific floor space near the garage door for quick access during yard work.
Don’t forget about seasonal items! Install overhead storage racks for items you only need occasionally, such as spare flower pots or winter garden covers. Use clear, labeled bins to organize smaller items like plant markers, garden twine, and spare parts.
Create a potting station by repurposing an old table or building a simple workbench. Add shelving above it for storing soil, fertilizers, and other gardening supplies. To prevent moisture-related issues, keep chemical products off the floor and store them in sealed containers on sturdy shelves.
Remember to leave enough clearance space around your garden zone for easy movement and tool retrieval. A well-organized garden tools area not only makes yard work more efficient but also helps extend the life of your equipment.
Budget-Friendly Storage Hacks
Upcycled Storage Ideas
Looking to maximize your garage storage while staying within your budget-friendly organization tips? Upcycling everyday items is your answer! Transform old coffee cans into tool organizers by cleaning them thoroughly, adding a fresh coat of paint, and mounting them on pegboards. Those plastic laundry detergent containers with handles make perfect storage bins for small items like nuts, bolts, and screws – just clean them well and add clear labels.
Got some old wooden pallets? They’re perfect for vertical storage solutions. Mount them on your garage wall to create instant shelving for paint cans, gardening supplies, or sports equipment. Empty plastic milk jugs can become clever scoops for pet food, bird seed, or ice melt, while their bottom halves work as organizing trays.
Don’t toss those old mason jars! Screw their lids under a wooden shelf, and you’ve got hanging storage for small items. PVC pipes can be cut to size and mounted horizontally to store long-handled tools like rakes and shovels. Even old filing cabinets can find new life in your garage – they’re perfect for storing power tools and hardware.
Remember those sturdy cardboard boxes from your last appliance purchase? Cut them to size, cover with contact paper for durability, and use them as drawer organizers. Old curtain rods can become instant tool hangers when mounted between wall studs.
Dollar Store Organization
Transform your garage organization without breaking the bank using clever dollar store organization ideas. Start by picking up plastic bins in various sizes to sort and store smaller items like nuts, bolts, and craft supplies. Clear shoe organizers can be repurposed as storage for spray cans, cleaning supplies, and garden tools – simply hang them on the back of your garage door or wall.
Create custom drawer organizers using dollar store plastic baskets and bins, perfect for workbench organization. Combine multiple plastic containers to create modular storage systems that can grow with your needs. Command hooks and adhesive strips, readily available at dollar stores, are excellent for hanging lightweight tools and sports equipment.
Consider using plastic magazine holders to store rolls of wrapping paper, vinyl, or blueprints vertically. Dollar store wire baskets can be mounted on walls to hold balls, gloves, and other sports gear. For smaller tools and accessories, repurpose cutlery trays as organized drawer inserts.
Label everything using dollar store adhesive labels or masking tape to maintain order. Stack and connect plastic containers using zip ties or binder clips to create vertical storage solutions. Remember to measure your space before purchasing containers to ensure they fit properly in your intended storage areas.
These budget-friendly solutions prove that effective garage organization doesn’t require expensive storage systems – just a bit of creativity and smart shopping at your local dollar store.
Transforming your garage from a cluttered catch-all space into an organized, functional area is an achievable goal that can significantly improve your home’s functionality and your peace of mind. By implementing the DIY organization ideas we’ve discussed, you can create a garage space that not only stores your belongings efficiently but also makes them easily accessible when needed.
Remember that successful garage organization doesn’t require an enormous budget or professional expertise. Starting with a thorough cleanout, categorizing your items, and implementing smart storage solutions like vertical space utilization and zone planning can make a substantial difference. The key is to begin with small, manageable projects and gradually work your way up to more complex solutions as your confidence and skills grow.
Whether you choose to start with simple pegboard installations, build your own workbench, or create a sophisticated overhead storage system, each improvement contributes to a more organized and enjoyable space. Don’t forget to maintain your newly organized garage by regularly reviewing and adjusting your storage solutions as your needs change.
Consider combining different storage methods we’ve covered to create a customized system that works best for your specific needs. The beauty of DIY garage organization is that you can adapt and modify solutions to fit your space, budget, and lifestyle perfectly.
Take action today by selecting one area of your garage to tackle first. Start with a simple project that you feel confident about, and let that success motivate you to continue organizing the rest of your space. Remember that garage organization is an ongoing process, not a one-time event, so be patient with yourself as you work toward your goals.
With these ideas and strategies in hand, you’re well-equipped to begin your garage organization journey. The satisfaction of completing these DIY projects and enjoying a well-organized garage will make all your efforts worthwhile. Happy organizing!