Transform your living space with personalized, budget-friendly DIY crafts that blend creativity with functionality. Whether you’re a seasoned crafter or just starting out, crafting your own home décor pieces offers endless possibilities to express your unique style while saving money. From upcycled mason jar vases to handcrafted wall art, these projects combine readily available materials with simple techniques to create stunning pieces that rival store-bought alternatives.
Master basic crafting skills like decoupage, painting, and basic woodworking to unlock a world of creative possibilities. Create statement pieces that reflect your personality – transform thrift store finds into elegant centerpieces, design custom wall hangings that perfectly match your color scheme, or craft seasonal decorations that bring fresh energy to your space throughout the year.
Ready to dive in? This guide explores fifteen achievable DIY projects that range from 30-minute quick fixes to weekend masterpieces. Each project includes detailed supply lists, step-by-step instructions, and professional tips to ensure beautiful results, regardless of your experience level. Discover how simple materials and a creative mindset can revolutionize your home’s aesthetic without breaking the bank.
Rustic Wall Art That Transforms Empty Spaces
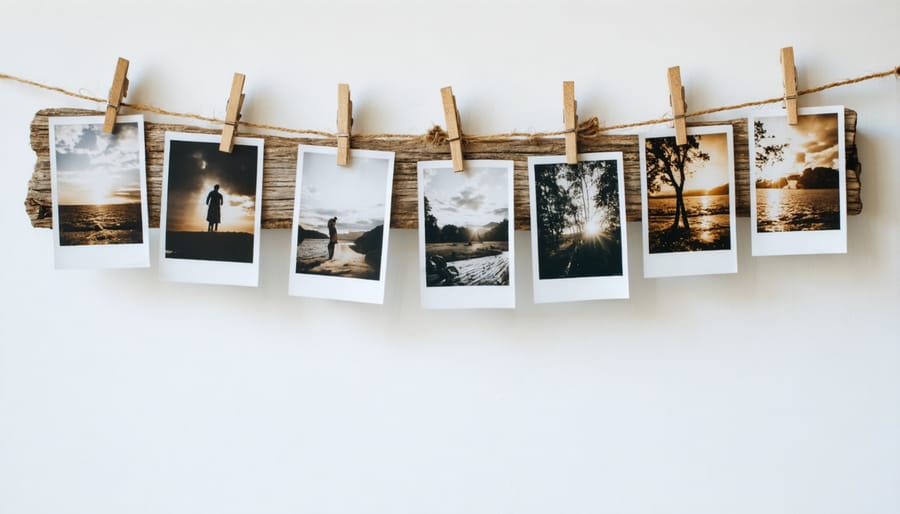
Farmhouse-Style Photo Display
Transform your cherished memories into charming vintage-inspired home decor with this delightful photo display project. All you’ll need is some rustic twine, wooden clothespins, and your favorite photographs to create a personalized wall feature that adds character to any room.
Start by gathering your materials: 15-20 feet of natural twine, 12-15 wooden clothespins, small hooks or Command strips, and 8-10 of your most treasured photos. For an authentic farmhouse look, consider printing your images in black and white or sepia tones.
Begin by deciding on your display pattern. A classic approach is creating three horizontal rows, each slightly shorter than the one above it, forming a subtle triangle shape. Secure your hooks or Command strips to the wall, ensuring they’re level and spaced about 3-4 feet apart for each row.
Tie your twine securely to the hooks, maintaining gentle tension without pulling too tight. The slight natural droop of the twine adds to the casual, lived-in charm. Before hanging your photos, arrange them on a flat surface to experiment with different combinations and spacing.
Clip your photos to the twine using the wooden clothespins, spacing them evenly along each row. Mix up the orientation of your images – combine both portrait and landscape formats for visual interest. For extra charm, consider weathering your clothespins with a light wash of watered-down white paint or leaving them natural for a more rustic feel.
Pro tip: Keep a few extra clothespins handy to easily swap out photos for seasonal updates or when you want to display new memories. This versatile display can evolve with your family’s story while maintaining its cozy, farmhouse appeal.
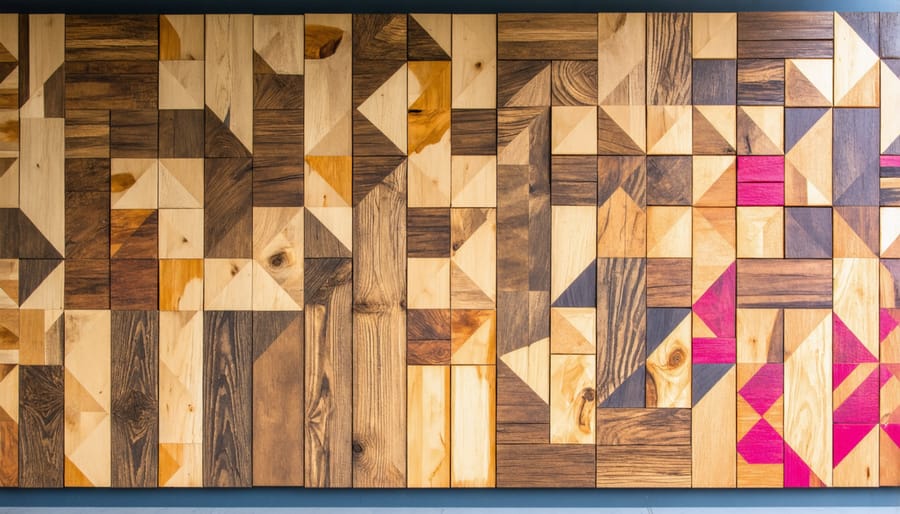
Geometric Wood Wall Art
Transform your wall into a stunning piece of modern art with this eye-catching geometric wood design. Like many wooden decor projects, this one combines simplicity with visual impact.
Start by gathering your materials: thin wooden boards (1/4 inch thick), wood stain in your chosen colors, a saw (hand or power), measuring tape, pencil, level, and wood glue. You’ll also need basic wall mounting hardware.
Begin by sketching your geometric pattern on paper. For beginners, try a simple repeating triangle or diamond design. Cut your wooden boards into pieces according to your pattern – most geometric designs work well with pieces ranging from 6 to 12 inches in length.
Sand all pieces thoroughly and wipe clean. Apply wood stain in your chosen colors, allowing each piece to dry completely. Consider using 2-3 complementary colors plus some natural wood tones for visual interest.
Create your design on the floor first, arranging pieces until you’re satisfied with the pattern. Take a photo for reference. For installation, start at the center of your wall and work outward. Use a level to ensure straight lines, and apply wood glue between connecting pieces. Secure outer pieces to the wall using appropriate mounting hardware.
Pro tip: Leave a small gap (about 1/8 inch) between pieces to account for wood expansion and create more defined lines in your pattern. For a cohesive look, choose colors that complement your existing room decor.
This project typically takes a weekend to complete and creates a conversation-worthy focal point in any room.
Cozy Textile Projects for Living Spaces
No-Sew Pillow Covers
Transform your throw pillows without touching a needle and thread! This clever no-sew technique lets you create stunning pillow covers using just fabric and iron-on hem tape. It’s perfect for seasonal updates or when you want to refresh your decor on a budget.
Start by selecting a fabric that complements your room’s color scheme. You’ll need enough material to wrap around your pillow with a 2-inch overlap on all sides. Iron-on hem tape will be your best friend for this project – it creates strong, lasting bonds between fabric pieces.
Here’s your step-by-step guide:
1. Measure your pillow’s width and height, then add 4 inches to each measurement
2. Cut your fabric according to these dimensions
3. Iron your fabric to remove any wrinkles
4. Lay the fabric face-down on a flat surface
5. Position iron-on hem tape along three sides
6. Fold the edges over the tape, following the package instructions
7. Iron carefully to activate the adhesive
8. Create an envelope closure by folding the remaining side in overlapping sections
9. Secure with more hem tape
10. Let it cool completely before inserting your pillow
Pro Tips:
– Pre-wash your fabric to prevent shrinkage later
– Use medium heat on your iron to avoid damaging the hem tape
– Test the hem tape on a small fabric scrap first
– Choose medium to heavyweight fabrics for best results
This project takes about 30 minutes to complete, and you can easily make multiple covers to swap out seasonally. It’s also a great way to upcycle old curtains or tablecloths into fresh decor pieces. The best part? If you make a mistake, you can simply peel off the hem tape and start again – no harm done!
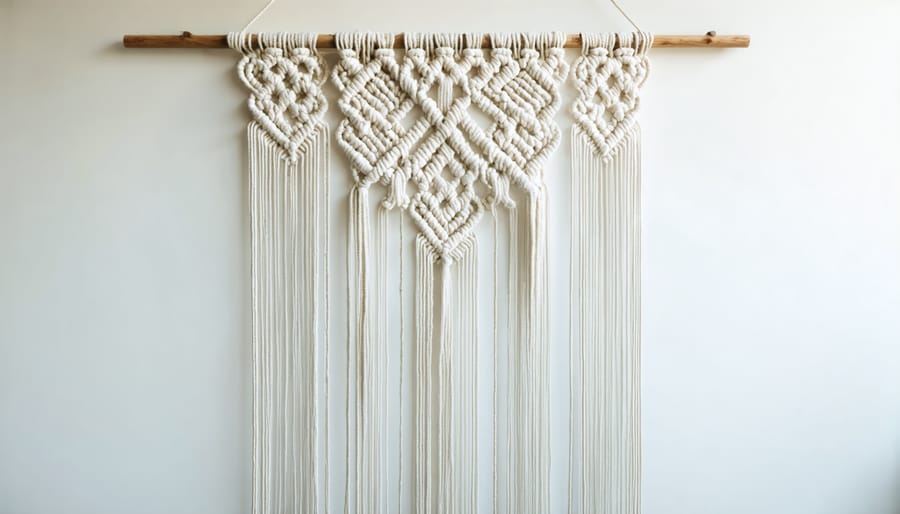
Macramé Wall Hanging
Transform your living space with a stunning macramé wall hanging that adds texture and bohemian charm to any room. This versatile craft project requires minimal materials and can be completed in an afternoon, making it perfect for both beginners and experienced crafters.
Materials needed:
– Cotton rope (4-6mm thickness)
– Wooden dowel or branch
– Scissors
– Measuring tape
– Optional: wooden beads
Start by cutting eight pieces of rope, each measuring about 6 feet long. Fold each piece in half and attach them to your wooden dowel using the basic larks head knot: fold the rope in half, place the loop behind the dowel, bring the loose ends through the loop, and pull tight.
Now for the fun part – creating patterns! Begin with the square knot, which forms the foundation of most macramé designs. Take four adjacent strings (two from each larks head knot) and tie them together: left cord over middle cords, right cord under and through the loop on the left. Repeat in the opposite direction to complete one square knot.
Continue making square knots in rows, alternating their placement to create a diamond pattern. After a few rows, try incorporating some diagonal half-hitch knots for variety. These are made by holding one cord diagonally while wrapping other cords around it.
Pro tip: Keep your tension consistent throughout the project for a polished look. If you’re feeling creative, add wooden beads between knots or create different sections using alternating patterns.
To finish, trim the bottom ends at an angle or create a V-shape for added visual interest. Gently brush out some of the rope ends with a comb to create a soft, frayed effect that enhances the boho aesthetic.
Remember, macramé is highly customizable – feel free to experiment with different knot combinations and patterns once you’ve mastered the basics. Your wall hanging will add instant character to any room while showcasing your crafting skills.
Upcycled Container Gardens
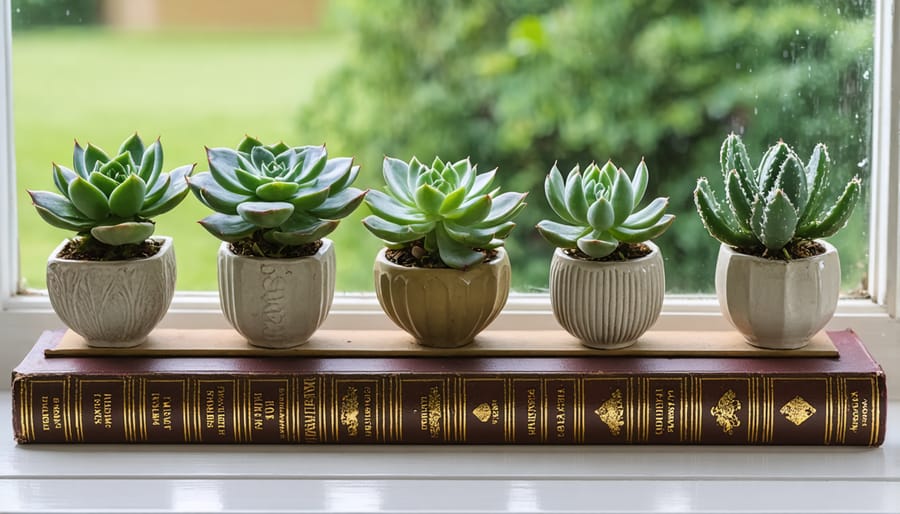
Vintage Book Planters
Transform old hardcover books into charming succulent planters with this eco-friendly project that adds a touch of vintage whimsy to your home. Start by selecting a thick hardcover book that’s at least 2 inches deep – thrift stores are perfect for finding candidates that are beyond reading condition.
Begin by mixing equal parts white glue and water in a bowl. Using a wide brush, seal the edges of all pages together by applying the mixture liberally. Once dry, open the cover and draw a rectangle on the top page, leaving about 1.5 inches of border. Using a craft knife, carefully cut through several pages at a time until you create a cavity deep enough for your plants.
Seal the inside of the cavity with clear plastic liner or a small plastic container that fits snugly. Make sure to add drainage holes if using plastic liner. Seal all cut edges with mod podge or white glue to prevent moisture damage. Fill the cavity with well-draining succulent soil mix.
Plant your chosen succulents, keeping in mind that smaller varieties work best for this project. Consider combining different colors and textures for visual interest. Finish by decorating the book’s spine with vintage-style labels or leave it natural for an authentic look.
Remember to water sparingly and place your planter where the book won’t be damaged by excess moisture. This conversation piece works beautifully on coffee tables, windowsills, or arranged with other vintage items on a bookshelf.
Hanging Herb Garden
Transform your kitchen into a functional herb haven with this stylish hanging garden project. Not only will it keep fresh herbs within arm’s reach while cooking, but it also adds a gorgeous living element to your decor. Using simple materials like mason jars, leather straps, and basic hardware, you can create a custom herb display that maximizes vertical space and brings a touch of nature indoors.
Start by gathering wide-mouth mason jars, leather strips (or sturdy ribbon), brass screws, and wall anchors. Clean your jars thoroughly and drill drainage holes in the lids for proper plant care. Cut your leather strips to size, ensuring they’re long enough to create a secure cradle for each jar. Thread the leather through the jar’s neck and secure it to the wall using brass screws and anchors, creating an attractive hanging mechanism.
Fill your jars with well-draining potting soil and plant your favorite cooking herbs like basil, thyme, mint, or rosemary. Position your hanging garden near a kitchen window that receives adequate sunlight. For the best results, arrange the jars at slightly different heights to create visual interest and ensure all plants receive enough light.
Remember to water your herbs regularly, but avoid overwatering as the glass jars don’t allow excess moisture to escape. This living wall art not only looks beautiful but also provides fresh herbs for your culinary adventures year-round.
Expert tip: Label each jar with small wooden tags for both practical and decorative purposes, and consider grouping herbs with similar water needs together.
Statement Pieces from Everyday Items
Mirror Makeover
Transform a basic mirror into a stunning focal point with these creative framing techniques that won’t break the bank. Plain mirrors are like blank canvases waiting for your artistic touch, and with a few simple materials, you can create a custom piece that perfectly matches your decor style.
Start by thoroughly cleaning your mirror and gathering your materials. For a rustic look, consider using reclaimed wood pieces cut to size and arranged in a herringbone pattern around the mirror’s edge. Sand the wood lightly, apply your chosen stain or paint, and secure the pieces using construction adhesive.
For a coastal vibe, collect seashells, starfish, and small pieces of driftwood. Arrange them in a pleasing pattern before gluing them onto a sturdy backing frame. Remember to seal natural materials with clear polyurethane to protect them from moisture and dust.
Love the glamorous look? Create a mosaic frame using broken mirror pieces or glass tiles. Always wear protective gloves when handling sharp edges, and use mirror adhesive for the best hold. Space the pieces evenly, then fill the gaps with grout in a complementary color.
Here’s a quick and easy option: Use rope or twine to create a nautical-inspired frame. Simply hot glue the rope in continuous circles around the mirror’s edge, tucking the ends under neatly. For added interest, try combining different thicknesses of rope or adding decorative knots at the corners.
Paint lovers can create stunning effects using masking tape and metallic paints. Create geometric patterns on a plain frame, or freehand an organic design directly onto the mirror’s edge using glass paint. Just be sure to protect the mirror’s surface with tape before painting.
Pro tip: Always ensure your frame materials are securely attached and the mirror is properly mounted to the wall using appropriate hardware for its weight. A beautiful frame means nothing if it’s not safely installed.
Pendant Light Transformation
Transform an ordinary pendant light into a stunning focal point with this budget-friendly makeover project. Whether you’re working with a basic drum shade or a plain glass fixture, this DIY will help you create a designer-worthy piece that adds personality to any room.
Start by gathering your materials: your existing pendant light, decorative trim or ribbon, metallic spray paint (if desired), and a strong adhesive suitable for your chosen materials. If you’re updating a fabric shade, consider adding textural elements like jute rope, wooden beads, or even carefully arranged seashells for a coastal vibe.
For glass pendant makeovers, begin by thoroughly cleaning the surface. Consider using frosted glass spray for a sophisticated look, or apply geometric patterns using painter’s tape and glass paint. You can also wrap copper wire around the fixture in a deliberate pattern for an industrial-chic appearance.
When working with drum shades, remove any existing trim and measure the circumference for your new decorative elements. Layer different materials for depth – try combining metallic ribbon with natural fibers, or create an ombré effect using gradually darkening shades of trim. Secure each layer with fabric glue, ensuring even spacing and clean lines.
Expert tip: Before making permanent changes, test your design by temporarily attaching elements with painter’s tape. This allows you to adjust the composition until you’re completely satisfied with the look.
For a modern twist, consider painting the fixture’s hardware. Matte black, brushed gold, or copper can instantly update the entire piece. Remember to use appropriate metal primers and paints, and work in a well-ventilated area.
Safety note: Always disconnect the power before working on any light fixture, and ensure all decorative elements are securely attached and heat-resistant. Keep embellishments away from the bulb and check that your modifications don’t interfere with the fixture’s functionality or pose any fire hazards.
This simple transformation can be completed in an afternoon and will give your space that custom-designed feel without the designer price tag.
As you embark on your DIY home decor journey, remember that maintaining your handcrafted pieces is just as important as creating them. Dust your creations regularly with a soft microfiber cloth, and keep fabric items fresh by spot-cleaning when needed. For wooden crafts, apply a thin coat of protective wax or polish every few months to maintain their luster and protect against wear.
The beauty of DIY home decor lies not just in the final product, but in the creative process itself. Don’t be afraid to make mistakes – they often lead to unique, happy accidents that make your pieces truly one-of-a-kind. Start with simple projects and gradually challenge yourself with more complex ones as your confidence grows.
Remember that your home should reflect your personality, and handmade decor adds that personal touch that store-bought items simply can’t match. Keep your craft supplies organized and easily accessible to inspire spontaneous creative sessions. Set aside a dedicated crafting space, even if it’s just a small corner of your home.
Most importantly, enjoy the process! DIY crafting is a wonderful way to express yourself, save money, and create meaningful pieces that tell your story. Whether you’re making your first macramé wall hanging or upcycling furniture for the tenth time, each project adds character to your space and joy to your crafting journey. Start small, dream big, and let your creativity flourish!