Maintaining your water softener’s brine tank isn’t just about better-tasting water – it’s crucial for protecting your entire water treatment system and extending its lifespan. A clean brine tank prevents salt bridges, improves system efficiency, and ensures consistent soft water throughout your home. Regular maintenance of your brine tank can save you hundreds in repairs and replacement costs while maintaining optimal water quality. Whether you’re tackling your first cleaning or establishing a maintenance routine, this guide will walk you through the essential steps to clean your water softener’s brine tank safely and effectively. Let’s dive into the proper techniques that will keep your system running smoothly for years to come.
Why Clean Your Brine Tank?
Signs Your Brine Tank Needs Cleaning
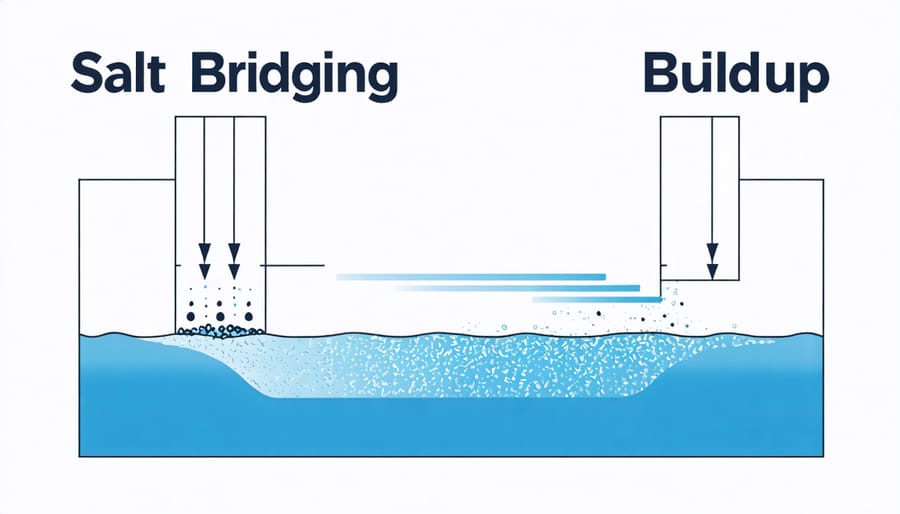
Your brine tank plays a crucial role in your water softener’s performance, and knowing signs it’s time for maintenance can help prevent major issues. Watch out for salt bridges – crusty layers of salt that form at the top of the tank, preventing proper salt dissolution. If you notice your water isn’t as soft as usual or your soap isn’t lathering well, this could indicate your brine tank needs attention.
Look for salt mushing at the bottom of the tank, which appears as a thick, sludgy paste. This common problem can block the water flow and reduce your system’s efficiency. Dirty or discolored water coming from your faucets is another red flag that shouldn’t be ignored.
Keep an eye on the salt level – if it’s not decreasing as expected or if you spot dark-colored buildup around the edges of the tank, it’s time for a cleaning. Strange noises during the regeneration cycle or a strong, unpleasant odor coming from the tank are also clear indicators that your brine tank needs immediate attention.
Preparation Steps
Essential Tools and Materials
Before starting your brine tank cleaning project, gather these essential items:
• A sturdy bucket or container for water removal
• Clean water for rinsing
• Protective rubber gloves
• Safety goggles
• Long-handled brush or scrubber
• Non-toxic cleaning solution (warm, soapy water works well)
• Shop vacuum (optional but helpful)
• Clean cloth or sponge
• Flashlight for inspection
• Face mask to avoid salt dust
Having these tools ready will make the cleaning process smoother and safer. Most items are common household supplies, but if you’re missing anything, they’re readily available at your local hardware store. Remember to choose cleaning materials that won’t harm your water softening system or leave harmful residues behind.

Safety Measures
Before diving into cleaning your brine tank, let’s prioritize your safety. Always wear protective rubber gloves and safety goggles to shield yourself from salt residue and cleaning solutions. Ensure your work area is well-ventilated, as mineral buildup can create musty odors. Disconnect the power supply to your water softener system before starting any maintenance work.
If you use cleaning solutions, avoid mixing different chemicals as this can create harmful fumes. Keep children and pets away from the work area during the cleaning process. Have a bucket of clean water nearby for emergency rinsing if needed. If your brine tank is particularly heavy with salt, consider asking someone to help you move it to prevent back strain.
Remember to store any cleaning materials safely afterward and wash your hands thoroughly when finished.
Step-by-Step Cleaning Process
Emptying the Tank
Start by turning off your water softener system and disconnecting it from the power source. Put on waterproof gloves and place a bucket or wet vacuum nearby. Using a large cup or small container, begin scooping out the salt and brine solution from the tank. Pour the contents into heavy-duty garbage bags or directly into your utility sink. For stubborn salt bridges, break them up gently with a broom handle before removing. Once you’ve removed most of the contents, tilt the tank slightly to drain remaining water into your bucket. If using a wet vacuum, ensure it’s rated for liquid use. Remember to dispose of the salt solution properly – never dump it on your lawn or garden as it can harm plants and soil quality. Keep children and pets away during this process to avoid accidents with the salty water.
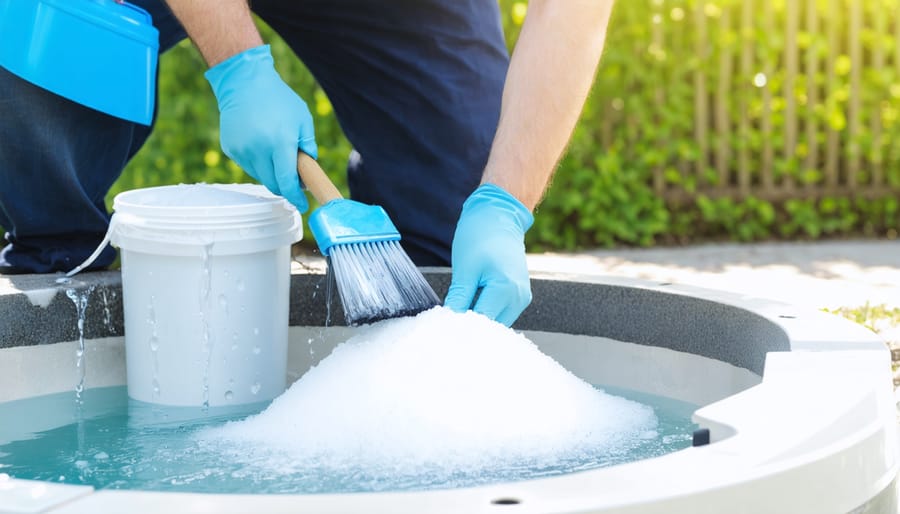
Cleaning and Sanitizing
Once you’ve emptied the brine tank, it’s time for a thorough cleaning. Start by mixing a gentle cleaning solution using 2-3 gallons of warm water and 2 tablespoons of unscented household bleach. This mixture will help sanitize the tank without leaving harmful residues.
Using a soft-bristled brush, scrub the interior walls of the tank, paying special attention to any visible salt buildup or slimy residue. Don’t forget to clean the brine well and float assembly – these components often accumulate the most buildup. For stubborn salt bridges or scales, you can use a plastic scraper, but avoid metal tools that might damage the tank.
After scrubbing, rinse the tank thoroughly with clean water. To ensure all bleach solution is removed, fill the tank with about 3 gallons of clean water, let it sit for 5 minutes, then drain it completely. Repeat this rinsing process twice more.
For the grid plate at the bottom of the tank, remove it if possible and clean it separately using the same cleaning solution. This helps prevent bacteria growth and ensures proper brine flow.
Remember to inspect all components while cleaning. Look for any cracks, damage, or excessive wear that might need attention. If you notice a musty smell or unusual discoloration, you might need to perform additional cleaning cycles or consult a professional.
Refilling and Testing
After cleaning your brine tank, it’s time to refill it with fresh water softener salt. Pour the salt carefully into the tank until it’s about two-thirds full, leaving enough space for water. Add water until it reaches about 6 inches above the salt level.
Before putting your system back into service, run a manual regeneration cycle to ensure everything is working properly. Keep an eye on the system during this process to check for any unusual noises or leaks.
Test your water hardness after 24 hours using a water testing kit. If the readings aren’t what you expect, you may need to adjust your system’s settings or check for any missed issues during cleaning.
Pro tip: Mark your calendar for the next cleaning session – regular maintenance every 6-12 months will keep your water softener running efficiently and extend its lifespan.
Maintenance Tips
Regular maintenance is key to keeping your brine tank running efficiently. Check the salt level monthly and maintain it at least one-third full, but never fill it more than two-thirds to prevent salt bridging. For more detailed water softener maintenance tips, consider creating a regular cleaning schedule.
Inspect the brine tank every three months for salt mushing, bridging, or buildup along the walls. Clean the brine tank thoroughly at least once a year, or more frequently if you notice decreased water quality. Use high-quality salt pellets to minimize residue and prevent clogging.
Keep the area around your water softener clean and dry, and check for any leaks or unusual noises during operation. Monitor your water quality regularly – if you notice changes in taste, smell, or soap lather, it might be time for an early cleaning. Consider setting calendar reminders for these maintenance tasks to ensure they don’t get overlooked.
When adding salt, break up any visible chunks to prevent bridging, and always use clean tools dedicated to brine tank maintenance to avoid contamination.
Regular maintenance of your brine tank is crucial for keeping your water softener running efficiently. By following proper cleaning procedures every 6-12 months, you can prevent salt bridges, mushy salt, and bacterial growth while extending your system’s lifespan. Remember to always prioritize safety, use appropriate cleaning materials, and maintain proper salt levels. A well-maintained brine tank not only ensures better water quality but also saves you money on repairs and replacements in the long run.